Showing posts with label 2' x 2' Gaming. Show all posts

Friday, 14 March 2025

Wargaming 4Play - Part II

After the previous game with 4 units per side and 4 Turns in which to achieve victory, I decided to tweak things a bit based upon what I felt I had learnt from the game. Namely I needed to increase the Attackers force by about 50%, giving me 6 units against 4. I also changed the units for both sides as can be seen below:

OOB - Attackers
1 x Grenadiers (Superior)
2 x Line Infantry
1 x Light Infantry
1 x Medium Artillery
1 x Light Cavalry

OOB - Defenders
2 x Line Infantry
1 x Medium Artillery
1 x Light Cavalry

The Game
The victory conditions remained the same as last time, so without further ado, let the play begin!

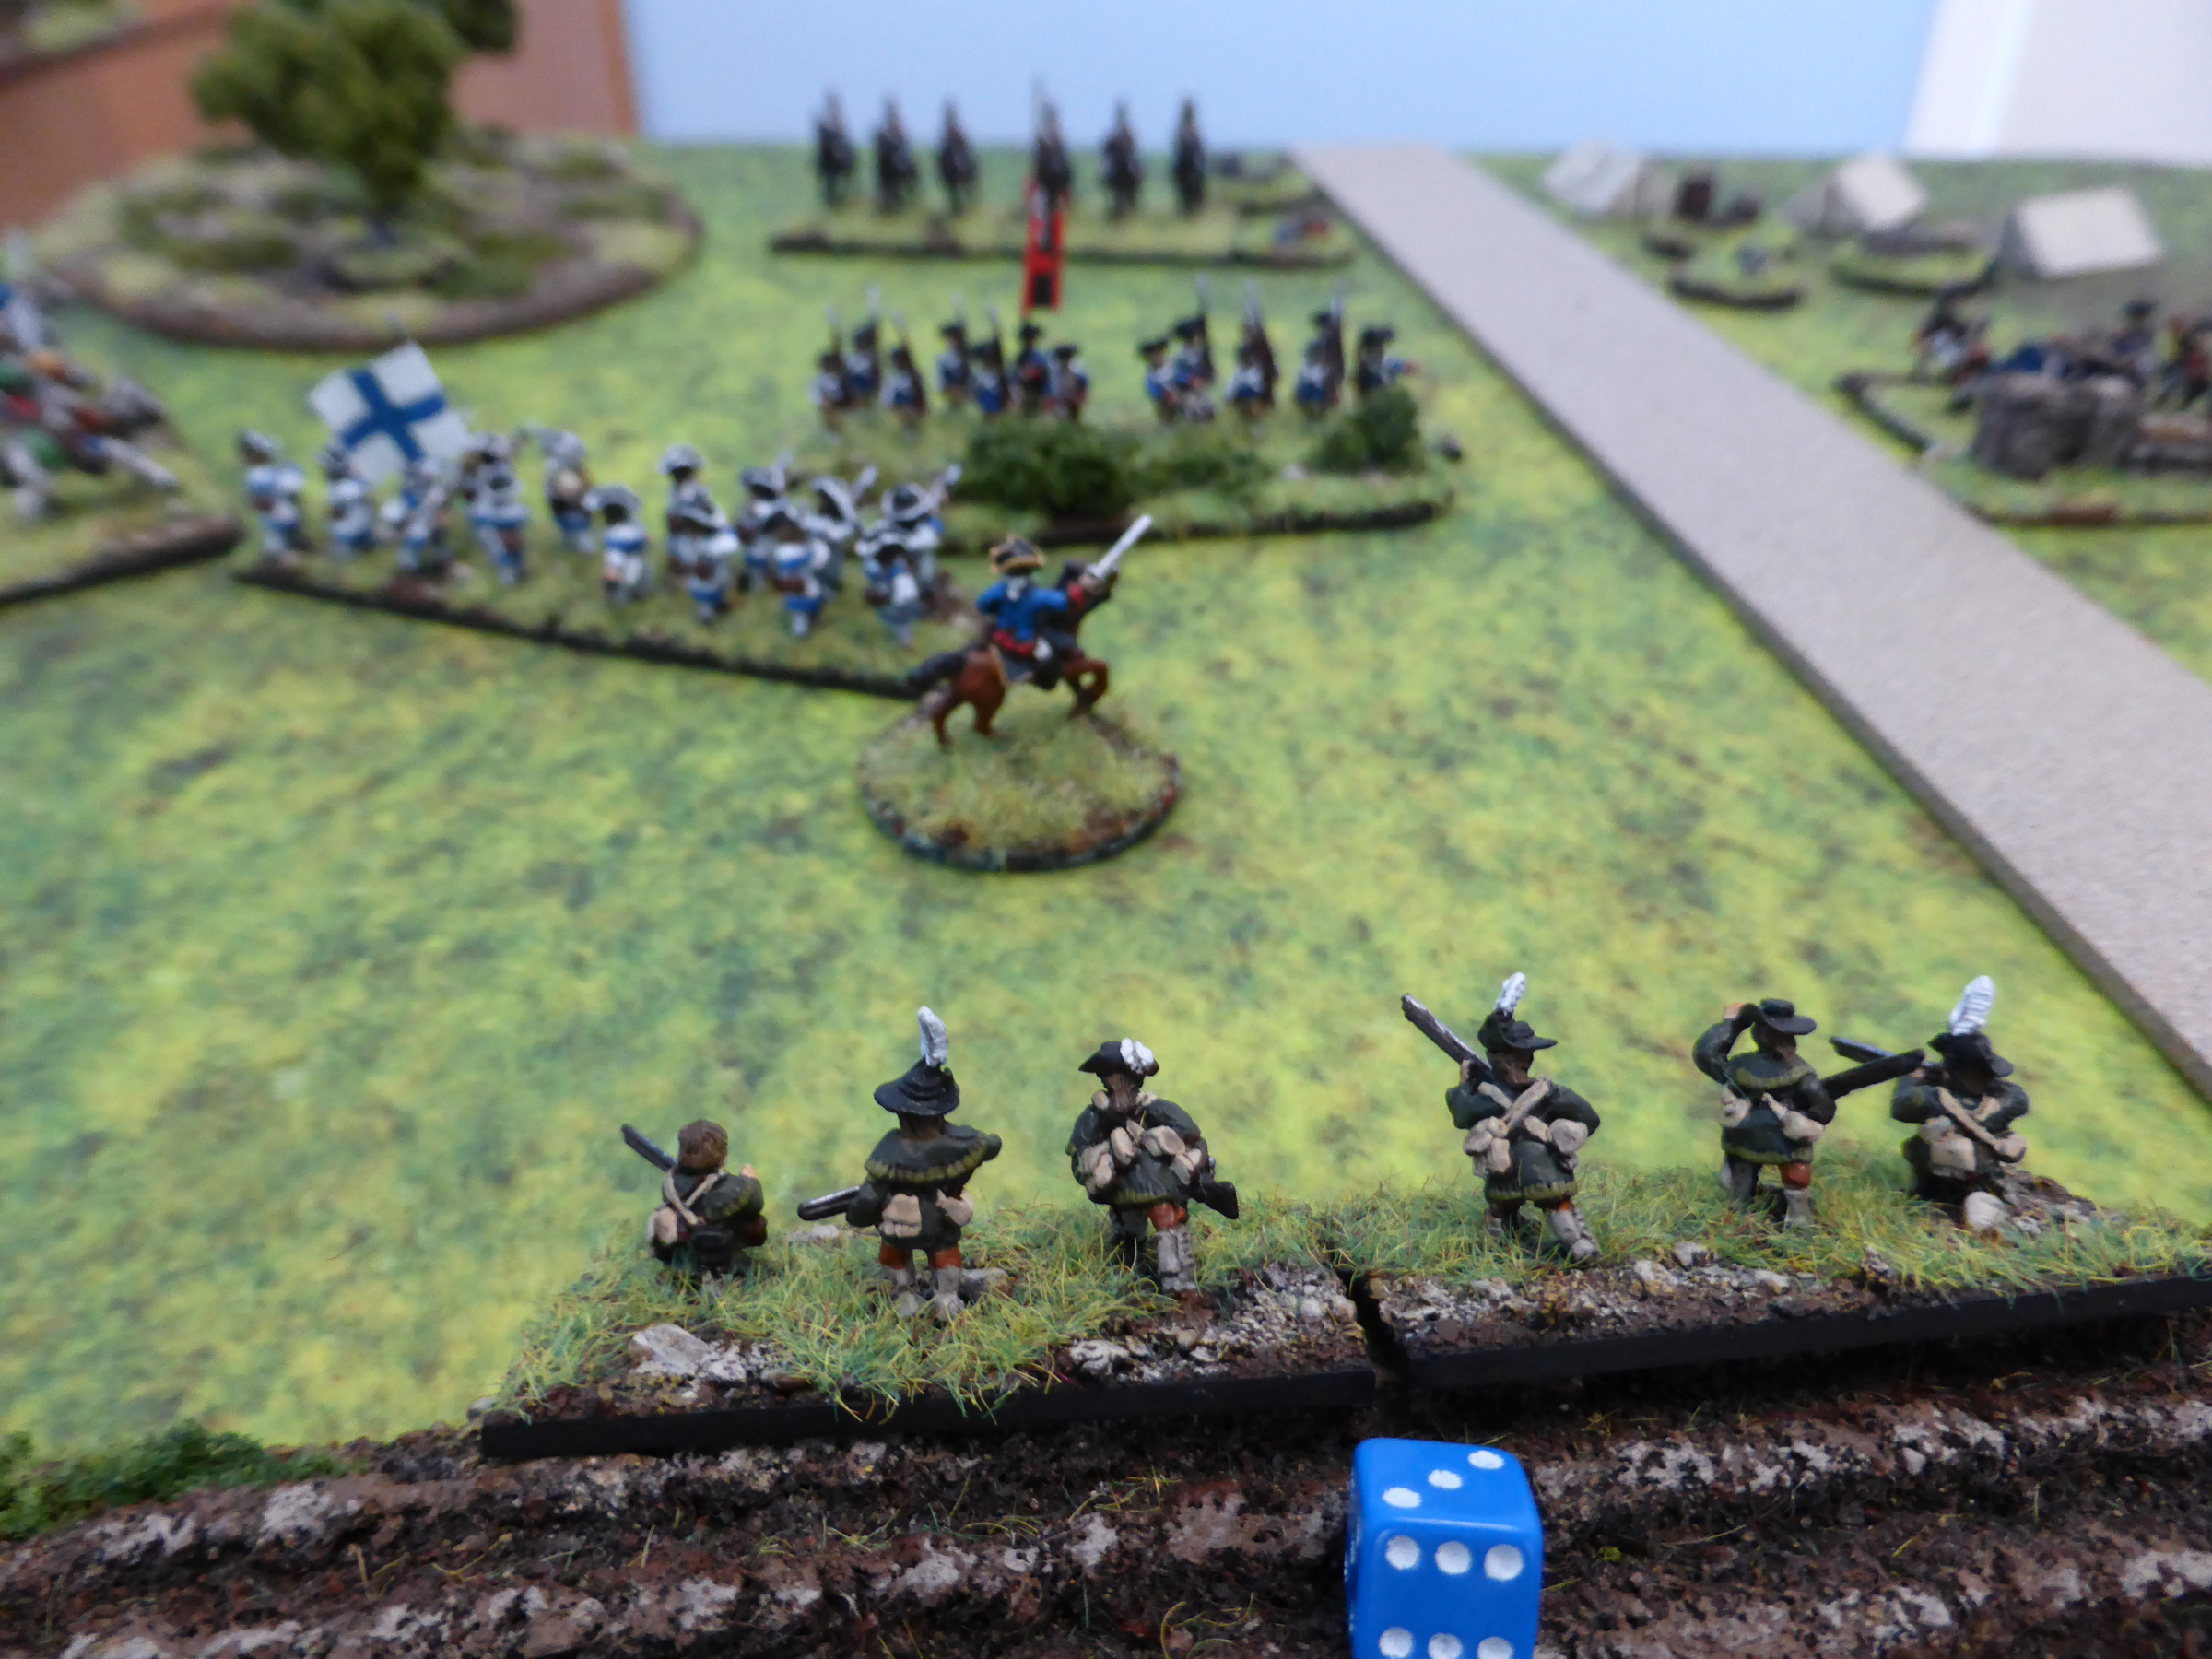
An overview of the table, with the Attackers on the left once more. The terrain was moved slightly to make it seem as if the defenders had set up there defensive postion at a nautral choke point.

The Defenders left flank.

And their right flank.

The Attackers right flank, with the Grenadiers on the right.

The Attackers artillery piece.

The Attackers left flank, with the Light Infantry on the right and the Light Cavalry in reserve.

At the start of the game, the Attackers Light Cavalry charged, with the Defenders counter-charging. 

The end of Turn 1. The Attackers left flank got a double move, allowing the Light Cavalry to make its charge. As the left flank closed towards the enemy, the Light Infantry came under crossing fire from the artillery, but survived to make it to shoot at the enemy. All across the front both sides engaged each other, but with no decisive hits occuring. The Attackers cavalry got the best of the melee, forcing the Defenders cavalry back to reform.

The Attackers right flank make one move and open fire.

The left flank close in and the Light Infantry have taken enough hits to affect their shooting ability.

The Attackers cavalry fail to follow up the retreating Defenders cavalry.

The Defenders cavalry are trying to reform.

The end of Turn 2. As the Defenders cavalry retreated to reform, the Attackers all got a double move, allowing them to really take the attack to the enemy at close quarters. Again shooting erupted across the front, resulting in the Attackers Light Infantry having to retreat to reform.

The Attackers right flank gets up close and personal. The unit on the left survived crossing fire from the artillery as they advanced. The Defenders Line Infantry have taken 3 hits and so are in a precarious position.

The Light Infantry having moved back to reform.

As the Line Infantry hold the attention of the Defenders, the Light Cavalry have moved up to possibly advance past the defensive line.

The Attackers canon hasn't really hit anything yet...

The end of Turn 3. The Grenadiers rout the Defenders infantry on the right flank, but their supporting infantry have been forced back to reform by canister fire from the artillery and are lucky not to have routed. Pressure is building on the Defenders right flank.

The Grenadiers make the first breakthrough.

But the Line Infantry have had to retreat to reform.

The Defenders right flank is very vulnerable.

The Attackers cavalry have moved past the Defenders to threaten the opposing cavalry.

The end of Turn 4. As the Grenadiers move to threaten the Defenders artillery in the flank, the Defenders right flank crumbles as both the Line Infantry and Cavalry rout. Victory is complete for the Attackers!

Despite getting into a good position to shoot, the Grenadiers miss the artillery.

The Line Infantry have moved back to reform, having come under artillery fire again.

The Light Infantry have rejoined the fray in time to ensure the demise of the Defenders Line Infantry.

The Attackers Cavalry complete the victory by routing the Defenders Cavalry.

The gun has no choice but to surrender.


Post Game Thoughts
Well another small game that I really enjoyed, with this one going down to the wire. Again actual game time was about 45 minutes, but it felt longer and was certainly an engrossing game throughout. Some thoughts from this game after the tweaks I made:

  • The Attacker's Artillery really didn't contribute anything to the game. I think I did make one mistake on the deductions to the dice roll for the artillery behind the gabions, but it didn't affect the outcome at all. Whilst having the Artillery felt right, games wise another unit of Infantry would have been a better choice.
  • The 6 x 4 worked much better than the previous 4 x 4, allowing the Attacker to have a fighting chance to take the position. In the game 2 Infantry units had to retreat to reform, but having those extra units allowed the attack to continue, which wouldn't have happened in the previous game.
  • The Attacker certainly got the jump on the Movement and Fire Initiative rolls, which helped their cause. Both side dice rolling was average, so no wild swings that might have affected the outcome.
  • The crossing fire worked well, as whilst it didn't stop the Infantry in its tracks, it did contribute to both units have to fall back and reform later on.
  • I didn't use the commanders ability to rally off hits, not their chance of being KO'd if close to a unit that came under fire or attack. Next time I hope to use both to see how that goes.
  • I can see these games forming a nice start or finish to a campaign, as here the Attackers would have captured a gun, which could have been woven into the campaign narrative, as either a bonus for the Attacker or a loss for the Defender.

So once again I hope you enjoyed this little action and as always, any comments are greatly appreciated!

TTFN.

Wednesday, 12 March 2025

Wargaming 4Play.

My wargaming mojo has been weak of late, due to some glorious early Spring weather combined with the usual trials and tribulations of being a parent carer. However whilst watching Youtube one afternoon, the following popped up as a recommendation, a video from Barry Hilton on one of his 4x4 games:


Many moons ago I'd seen these on his League of Augsburg site and had forgotten all about them, but they instantly reminded me of the fun you can have on quite a small table and with just a few units per side. So very 'One Hour Wagames' in fact. This spurred me on to set something up on my 2' x 2' table and see how things would play out. Afterall I was desperately in need of a wargaming hit after a few stressful days!

I decided to use the superb 'Honours of Wars' rules from my good friend Keith Flint, as not only do they always give a good game, but I had not had my 18thC figures out on the table for far too long. Having played plenty of Black Powder II earlier in the year, I felt a complete change of period was in order.

Attackers OOB
1 x Line Infantry (Superior)
3 x Line Infantry (Standard)

Defenders OOB
1 x Line Infantry (Standard)
1 x Light Infantry (Standard)
1 x Cavalry (Standard)
1 x Light Artillery (Standard)

Scenario Details
A few tweaks to suit using HoW:
  • The Attacker would automatically get the Movement Initiative in the first Turn. There after to be rolled for as normal.
  • Each unit would act as if it were 'Independent', using the 'Dependable' commander table.
So onto the game, with captioned photos giving details of how things unfolded.

An overview of the table, with the Attackers on the left.

Grenadiers lead the way in the centre, with Line Infantry on either flank and the centre.

The Defenders left flank.

The Defenders right flank.

The Defenders camp and slightly less than mobile artillery.

The view from the gun.

The end of Turn 1. The Attackers pushed forward, with the Grenadiers eager to close with the enemy, but the left flank failed to move. Both sides exchanged fire, but only a few hits were scored.

The Attackers right flank closes and opens fire.

The Line Infantry in the centre come under fire from the big gun.

The Grenadiers rush to try and overwhelm the Light Infantry by the barricade.

The end of Turn 2. The Attackers left flank suddenly decided to rush forward to join the action, whilst elswhere units moved forward to try and get to close range. The Defenders fire was rather effective, with the Line Infantry on the right flank forced to fall back to reform, with those in the centre just avoiding having to do so.

Devastating fire forces the Line Infantry to fall back and reform. Will they be able to make it back to the fray in time?

That big gun could have done more damage...

On the Attackers left flank, both units fail to disturb the Light Infantry behind the barricade!

The Defenders Light Cavalry poised to exploit any opportunity.

The end of Turn 3. The Defenders Light Cavalry charged the Line Infantry in the centre, routing them and then following on to the Line Infantry in the right who were reforming, routing them too. Simply devastating! Elsewhere the Grenadiers had been forced to retreat to reform and then routed as the Line Infantry from the centre fled past them. It was all over in a flash!

The Light Cavalry have taken hits, but see the second Line Infantry unit rout from their charge.

The Line Infantry from the centre and victims of the first charge in full on rout.

The Grenadiers follow suit.

Despite being in an excellent postion, the Line Infantry unit were all on their own.

The Defenders happy with how things panned out.


Post Game Thoughts
Well that was fast and furious and lots of fun, despite lasting only 3 Turns! It certainly did what I hoped it would do in allowing me to get in a very quick and simple game after a couple of weeks away from the games room. As always a few thoughts etc:
  • Despite not having played 'Honours of War' for quite some time, the rules all came back to me and felt very comfortable to play. I only had to refresh my mind a few times with the rulebook, as otherwise the QRS did everythinng I needed. A perfect reason to continue with sticking to a few core rulesets.
  • This sort of scenario, where you are straight into the action, is a great way to quickly learn the basic rules mechanics of any new set, or old ones for that matter. I think my game took about 45 minutes to play, if that, so plenty of time to press the re-set button at the end and have another go.
  • To play this again I think I would tweak the forces involved to suit the period and the rules, possibly giving the Attacker a lsight numerical or qualitative advantage. I've left the game set up so I can have a play around with this.
  • With the size of the board, I can see maybe up to 6 units per side working well and possibly a few more Turns. So as mentioned a the the start, all very 'One Hour Wargames' stuff.
  • The Attackers poor shooting in Turn 2 coupled with the opposite for the Defenders did for them in the end. There is no chance for subtly here as the scenario is very much about trying to overwhelm the Rearguard so the main force can try to get through. Normally you would hope to whittle the Defender down, but no chance of that here, which presents an interesting challenge.
  • The Light Cavalry's charge was very cinematic and as seen, very devastating. They bided their time well and made the most of the opportunity presented to them.
  • As with many of my recent games, this one has reminded me of how much I still have to paint, even to get to a good core force for both sides. But possibly more on that in another post...

Well I hoped you liked this quick little AAR and as always, any comments greatly appreciated!

TTFN.

Wednesday, 9 October 2024

Somewhere In Germany, Spring 1945 - Part Two

So with the scene all set, I managed to grab a few hours this afternoon to get the game going. Annotated photos will hopefully give you an idea of how things played out.

The end of Turn 1. Night, visibility 10cm. The Germans could hear movement to their front, but could not see anything nor make out exactly where it was coming from, due to British counter-measures. Two infantry companies advanced forward, led by their assault pioneers and supported by Churchill tanks.

The assault pioneers in position to blow a path through the dragon's teeth.

The Churchills move forward towards the gap created by the RAF during the night.

At the start of Turn 2, a scheduled artillery stonk hit the BUA, KO'ing the Stug III.

The end of Turn 2. Monty's Moonlight, visibility 25cm. The assault pioneers blow the gap in the dragon's teeth and the infantry move forward, supported by the Churchill tanks, both coming under fire as they do so. On the right an infantry company moves into the damaged building, losing a platoon on the way. The Sherman crab arrives ready to begin its work.


The Crab in position.

The infantry move forward and come under fire. The Pz IV by the wall engages in a firefight with the Churchills.

The Churchills struggle forward through the cratered road and field.

The end of Turn 3. Dawn, visibility 50cm. The British struggle to maintain momentum, coming under fire from all quarters. The Crab has cleared a path through the minefiled but the Churchills struggle to get through to exploit the opportunity.

The Churchills engage the dug-in MG unit by the barn, but fail to do much damage.

The infantry cannot really move forward at present.

A traffic jam ensues as Hobart's Funnies arrive, as stout German resistance holds up the advance.

The dug-in Volkssturm in the orchard cause problems for the British infantry.

The Panther duels with the Churchills, only managing to suppress one.

The end of Turn 4. Daylight and full visibility. The British FAO fails to get through and so even without the support of the artillery, they manage to KO the Pz IV and MG unit by the barn as well as assaulting the Volkssturm in the orchard, KO'ing them in the process. The German response is limited and they fail to inflict much damage upon the British.

As the Pz IV burns, the infantry take the orchard after assaulting the Volkssturm, ably supported by the tanks.

It's still a bit of a jam in the centre, but things are beginning to move forward a bit.

The stubborn MG nest is finally overcome.

The Churchills with some excellent shooting manage to suppress the Panther at the end of the road.

At the start of Turn 5 the RAF arrive and easily KO the Panther, much to the relief of the Churchill tank crews.

The end of Turn 5. Progress is steady as the tanks and infantry edge forward, with the infantry losing a platoon in the orchard, but the Churchill Crocodile makes short work of the Volkssturm in the BUA to its front.

The infantry push forward but come under fire, losing a platoon.

Hobart's Funnies easily KO the Volkssturm in the BUA.

The Churchills edge forward, wary of the Pak 40 to their front.

A view from the German positions.

The end of Turn 6. Even though the artillery and air support fail to arrive, the infantry and tanks push forward, with the Crocodile once again making short work of the Fallschirmjager platoon in the BUA.

The infantry occupy the BUA near the centre of the village.

The Crocodile clears out the FJ platoon.

There is little movement on the right flank, as they provide supporting fire to the other units.


End of the Game
By the point the Germans were well beyond their breakpoint, which they easily failed and so withdrew from the defensive positions. Even if they'd stayed put, the weight of numbers combined with the AVRE tanks would have quickly made their positions even more untenable.

Post Game Thoughts
Well I was a bit rusty on the rules front as it's been quite sometime since I played these rules, but most of it came back to me pretty easily. The game provided me with plenty to think about and I need to re-read a few bits just to get some things clear in my head. But as always a few musings on the game in no particular order:
  • Scheduled artillery is an absolute must in a game like this, as you really need to keep the defenders under pressure whilst you advance. This can be a mix of HE and Smoke, using both in many of my games. A creeping barrage would be good, but really only suitable in a bigger game I think.
  • Night, Monty's Moonlight and Dawn all worked well in terms of limiting visibility, helped the attackers but at the expense of some CV penalties.
  • In advance of the game I was looking at attacking BUA's and how that works in BKCII. To be honest I've never really been happy with this, but there are some options out there in BKCIV as well as the original CWC rules. Something I need to have a good think about for sure.
  • Hobart's Funnies/AVRE's really made a big difference for the British, especially the Crocodile which is just devastating as one would expect. 
  • Even though it was fun playing on a 2' x 2' table, which helped speed up game play and allowed a lot of action in a small space, it did hamper both sides somewhat, forcing them into a frontal assault. Moving forward a bigger baord would help give space for the attackers to develop their attacks and for the defenders to have more depth as well as the ability to manouevre their reserves.
  • The Germans never quite got going in the game and couldn't quite knock out any of the tanks early on, which might have changed things a bit. Losing the Stug III in the first artillery stonk did hit them hard.
  • Churchill tanks are tough! I thinnk if I'd used Shermans then there would have been more smoking tanks on the British side quite early on.
  • It was fun to get out my dragon's teeth and minefields, which I rarely do. Maybe some more games using them in the future would be good, certainly as part of a mini-campaign.
  • It's been a long time since I used the Close Assault rules and I think I got it right, but again this is something I need to double check in my post game reading.
  • Both sides dice rolling was pretty poor, especially for the British, often just getting a single '6' when rolling 12 dice!
  • Whilst I enjoyed the game, these late War attritional battles aren't as much fun as ones where there is more room ot manouevre. I can see why 1945 is rarely gamed, or at least so in my experience. 

What's Next?
Well having scratched that itch so to speak, it is now full on focus for the CWD, both in terms of painting, scenario creation, QRS and OOB etc. I'm still not sure if my gaming chum can make it but, if not, I have enough for a smaller game, so not all bad.

Thanks for reading and hope you enjoyed it.

TTFN.