With the third heatwave having finally broken, I managed to snatch a free few hours whilst SWMBO was out, to get another game of Honours of War in. Having had it set up for nearly a week, it was nice to finally have the time and motivation to get it played.
The Scenario
This is based upon the Battle of Krefeld 1758, but has been tweaked for the OHW rules, with further tweaks made by me to try and make it work for Honours of War.
The Blue General is defending two river crossings from what he thinks is a numerically inferior Red force. His complacency will be shattered when an additional Red force arrives in the Blue rear area.
Victory Conditions: The Red Force will win if there are no Blue units within 3" of either river crossing at the end of Turn 8.
OOB Austrian (Red)
2 x Infantry Brigades, each - 3 x Line Infantry, 1 x Medium Artillery
1 x Light Infantry Brigade - 2 x Light Infantry
1 x Cavalry Brigade - 2 x Cavalry
- 50% of the army starts to the North of the river.
- On Turn 3, the other half of the army arrives on the Western table edge.
OOB Prussian (Blue)
2 x Infantry Brigades, each - 3 x Line Infantry, 1 x Medium Artillery
1 x Mixed Brigade - 1 x Light Infantry, 1 x Medium Artillery, 2 x Cavalry
- 1/3 of the army is in reserve and cannot move until Turn 4.
- The army is in a defensive posture and cannot move North of the river
The Set Up
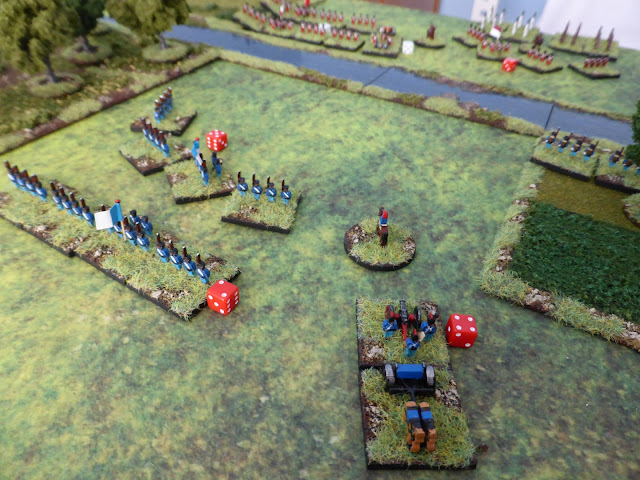
Once again the game was played on a 3' x 2' table, with deployments etc seen below:
 |
| An overview of the table. Blue is to the left of the river, Red to the right and the top. |
 |
| One Blue Brigade defending the bridge, saddled with a Dithering commander, requiring the General to be in attendance. |
 |
| Another Blue Brigade defending the ford. |
 |
| The Blue Mixed Brigade in reserve. |
 |
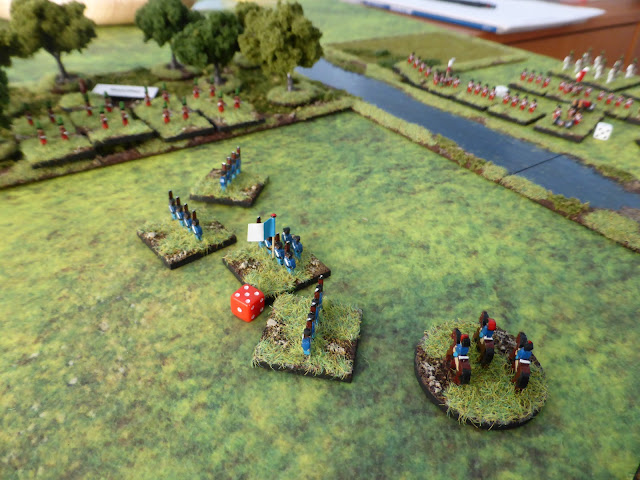
| The Red Cavalry Brigade, ready to act to pin some Blue units in place, just by their presence. |
 |
| A Red Brigade ready to contest the ford. |
 |
| The Red Light Brigade ready to move through the woods and into the Blue flank, with a Dashing commander to aid speedy progress. |
 |
| A Red Brigade ready to advance into Blue's rear area, saddled with a Dithering commander. |
The Game
As always, the captioned photos should give an idea of hos the game played out:
 |
| The end of Turn 1. Red made an Admirable move to the river, allowing them to deploy, as well as gaining the fire intiative. This saw Blue lose a Line Infantry unit, which had to fall back to reform. Both sides took further hits but to limited effect. |
 |
| Blue already pushed back from the ford. |
 |
| The end of Turn 2. As the Red Cavalry moved to the flank to try and get out of artillery range, both sides exchanged some devastating fire, each losing a Line Infantry unit. The ford was in danger of being lost by Blue already. |
 |
| Blues' Line Infantry that had just moved forward is routed, leading to the Artillery unit having to limber up and retire to try to reform. |
 |
| But Red had also suffered an early loss, but was in a better position than Blue by the ford. |
 |
| The end of Turn 3. As Blue began to pull back from the ford to try and form a defensive line, the Red force suddenly appeared on their left flank, with devastating consequences. The Blue right flank began to try and react to this sudden appearance by Red, but the Dithering commander was not quite sure what to do. |
 |
| The Blue Dithering commander begins to try and move to meet the threat on his left. |
 |
| The Red Line Infantry appear from the corn. |
 |
| The Red Light Infantry move with ease through the woods... |
 |
| ... and pour a devastating volley into the Blue Line Infantry, routing them. |
 |
| The lone Blue Artillery unit still pulling back to try and reform. |
 |
| The end of Turn 4. The Red force from the West continue to push aggressively forward, forcing a Blue Line Infantry unit back to reform. The Red force North of the river forms into line to prepare to begin to cross, but the Cavalry fail to move. |
 |
| The Blue right flank slowly forms into line and column to move towards Red. |
 |
| The Mixed Brigade spurs into action. |
 |
| The remnants of the Blue left flank. |
 |
| The Red force North of the river ready to cross the ford. |
 |
| A view from the West and the Red force threatening Blue's rear. |
 |
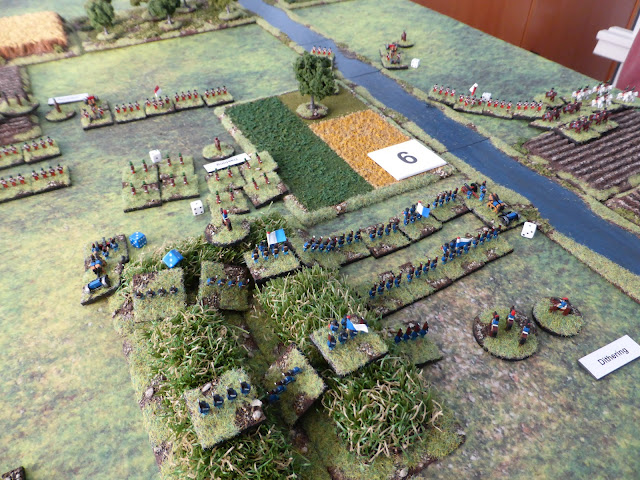
| The end of Turn 5. The Blue right flank meets up with the few reamining left flank units, but the Mixed Brigade fails to move up in support. Red tries to push forward, which the Light Brigade do rather aggressively, whilst those North of the river struggle forward. Both sides have one of those 'barn door' phases on the shooting front. |
 |
| Red pushes forward as the Blue line begins to coalesce. |
 |
| The end of Turn 6. As the Blue defensive crust begins to harden, Red continues to push forward, but once again the 'barn door' issue raises its head! |
 |
| The Red force North of the river tries to move forward to attack the Blue line in the flank. |
 |
| The Blue 'defensive crust'. |
 |
| The Mixed Brigade moves forward but is still too far behind. |
 |
| The Red Western force struggles to find space to deploy as the Light Brigade engages Blue in the centre. |
 |
| The end of Turn 7. With a rush of blood to the head, the Light Brigade commander charges forward with his troops into the Blue Artillery and Line Infantry, as both sides close up as best they can. In one of those 'MAD' moments, the Red Light Brigade is destroyed, but so are the Blue Artillery and Line Infantry! Yet again ineffective and desultory fire ripples across the front. |
 |
| The charge and its effect... |
 |
| ... and the aftermath after the smoke has cleared. |
 |
| The end of Turn 8. There is little movement from Blue due to holding a good defensive position, so Red pushes forward, but come under devastating fire (at last!), losing two Line Infantry units. In response all Red can manage is to rout an Artillery unit and force the Mixed Brigade Light Infantry to move back to reform. |
 |
| Losses on the right... |
 |
| ... and on the left. |
 |
| The Red Cavalry Brigade finally begin to cross the bridge. |
End of the Game
And with that the game was over after an exciting and eventful 8 Turns. Technically a Red victory as per the original scenario, given the Blue had no units close enough to either crossing of the river. However looking at the state of play, Red would struggle to prosecute the attack, with Blue working on interior lines. What might have swung it decisively for either side would have been a cavalry clash, with the winner certainly help gain control of the Field of Mars.
The Butcher's Bill was pretty even:
Red: 3 x Line Infantry, 2 x Light Infantry
Blue: 3 x Line Infantry, 2 x Artillery
Post Game Thoughts
Another excellent game of Honours of War, and certainly one with fortunes swinging one way and then the other! A few musings as always:
- Red got off to a flier on the shooting front, only for this good luck to tail off, with Blue getting that final effective volley in Turn 8 almost on the last dice throws.
- The Red Light Brigade's charge was certainly risky, some might say foolish, but I thought it was worth the gamble, which sort of paid off, but at terrible cost.
- The scenario was certainly interesting and another good challenge and in a sense nicely followed on from the previous one. I think it needs a tweak or two to make it work better, but maybe that's for another day.
- Having 'Dithering' commanders was fun again, but tied up both commanding Generals for most of the game. That random roll for all commanders at the start does add a wonderful level of friction and unpredictability, perfect for the solo gamer.
- When the game moved to the short table edge as it were, both sides really struggled to find room to manouevre, which caused a few problems and moved the game to one more of attrition, with no real chance to turn a flank etc.
- Both sides Artillery were less effective with this much more mobile battle, due to having to move so much.
- My rivers are really too wide for these rules, but luckily I have some new ones in progress, which will make for a better game IMHO.
What Next?
Well I think that's it for Honours of War for a while. With the weather being much more conducive to painting and gaming, I hope to get more of the former in so that I can resume my 'French-Canadians in Normandy' mini-campaign. Life is busy on the 'real life' front, so it might be a few days before I can get things set up, but with SWMBO away for the weekend, I aim to get the next game in...
As always, thanks for reading and commentating, plus of course any comments greatly appreciated!
TTFN.


A tighter game than I first thought … of course it was that turn 8 that did it. I smiled because I have an opponent who would have lost all enthusiasm as ‘BLUE’ before the turn 8 moment and might likely call the game early …… I prefer hanging on, you just never know!
ReplyDeleteI too thought it would be all over for Blue rather quickly, but fortuitous poor shooting by Red, meant they were able to form a good defensive line and then get in that killer blow right at the end. I was tempted to call the game early, but did think of you and play it out to the bitter conclusion, as you never know what might happen!
DeleteGreat write up Steve, a great encounter, loving the Woodentop Wars.
ReplyDeleteCheers
Stu
Thanks Stu! I'm loving getting the Commission Figurine troops out again for some fun games:).
DeleteAgain, another good contest, an interesting battle account, and a great looking table. I would be hard-pressed to award RED with a victory in this one. Perhaps a draw is more appropriate? Without knowing beforehand, I would fail to notice that you are fielding MDF "flats" in this game.
ReplyDeleteThanks Jon:)! I too view it as a draw, but technically a win for Red, based upon the original scenario. Playing it again I would alter the vicotry conditions, as with the benefit of hindsight, it would be too easy for Blue to sit by the bridge and hold on to gain victory, as Red would struggle to bring the Western Force across in time to get to grips as it were.
DeleteWhen playing the game, you do completely forget the 2.5D nature of the figures. I still have loads primed, so might push some more through to give more variety to my games...
well, I can tell that they're flats. Any angle other than straight on gives it away, but they do look nice and if flats are used throughout then it doesn't matter much. Or I'm so used to seeing things in Minecraft because of my son and daughter being into it, which is all blocks, that I'm just used to the look. 😆😁
DeleteYour eyes are better than mine Stew;)! When I've used them at shows, other gamers are truly surprised that they are in essence 'flat's, as you can only spot this when having a close up ganders at the figures.
DeleteAn enjoyable scenario. I thought Red army was going to roll up Blue army, but they recovered - just.
ReplyDeleteThanks Peter:). From the off I thought Blue would be easily rolled up, but they did manage to form that defensive crust just in time.
DeleteThe battle started rather well for the Reds, but the Blues hung on and the final outcome was much closer than I originally anticipated. Almost a Pyrrhic victory? Your MDF figures really do seem suited to this period of warfare.
ReplyDeleteSadly “real life” can be a bit of a bu99er, interfering with our “playing with our toy soldiers”. C’est la vie as they say across the channel 😉
Cheers,
Geoff
Certainly a game of two halves as it were Geoff! If the two Turns of 'barn door' shooting had been even average, then it might have tipped it in favour of Red. Real Life is rather busy at present, with lots going on most of the next few weeks, so precious little time for the important 'toy soldiers' stuff!
DeleteA lovely looking table as always Steve and much more of a fight than it looked like being in the first couple of turns! Red did achieve their aim, though, so I would call them the winners!
ReplyDeleteThanks Keith and it certainly didn't turn out into a walk in the park for Red as it first looked. As mentioned above, Red technically the winners, but rather Pyrrhic ones at that, given they lacked any real offensive strength!
DeleteGreat looking scenario sir!
ReplyDeleteThanks Michal:)!
DeleteCracking looking game, such a great set up on a small table, shows what can be done, it looks great, enjoyable battle report too, a real close, hard fought one.
ReplyDeleteThanks Donnie:)! Yep, you certainly don't need a back breaking 'standard' table or larger to get a good game in, yet still feels like a 'big' action. Certainly a much closer battle in the end compared to how Blue's position was in Turns 2-3.
DeleteGreat looking game and report. I forgot how effective light infantry can shoot in Hounors of War Vs Post of Honor.
ReplyDeleteThanks:)! For this game I gave the Light Infantry rifles just for that extra range. They are not always effective but in this game they came into their own for sure.
DeleteGreat looking game Steve. I also thought blue were not going to make it. It's interesting because I play with some whose " morale" would have collapsed earlier. Sometimes, it seems, that army morale rules are not needed. The players bring their own to the table.
ReplyDeleteThanks Richard:). I tend not to use any morale rules, but use my judgement as to what either side might do as losses begin to mount etc. In most games I try to play to a logical conclusion, if time permits, which is much easier now having a dedicated game room and no time pressure as it were.
DeleteI also thought it was going to be a crushing victory for Red at first but a technical win is still a win until you change the scenario! Lovely looking table as always!
ReplyDeleteBest Iain
Thanks Iain:)! I think the consensus is that Red looked on course for a bit of a walk over at the start, but thankfully Blue put up a good fight to make a game of it. Sometimes it can be tricky converting the OHW scenarios to other rulesets, in terms of movement rates against distances to be covered etc.
DeleteI find transferring the time scale difficult from OHW to be honest, still a great resource though!
DeleteBest Iain
I agree on both counts!
DeleteA great scenario Steve. Might try something similar. I don't think your river is too wide. If a unit is a battalion it only looks like 1/2 bn wide, or 75 yards/100 paces.
ReplyDeleteThanks Chris:). Some years ago I played a game with Keith using his 'Shadow of the Eagles' rules and we could only just shoot across the river due to it being too wide as it were. Not quite the same here, but a smaller depth river would look better, take up less space and slightly improve game play (I hope!).
DeleteGreat report and obviously a good game! Your table setups always look nice - and with 6mm you can get quite a substantial action into 3ft by 2ft, a lesson for us all. I assume these are the semi-flat MDF figures too, they work really well. And with apologies to C.S. Grant, is 'OHW' the best book of scenarios on the market?
ReplyDeleteThanks David:)! Whilst Grant and Asquith's books are excellent, personally I find it easier to translate the OHW ones for the rules I use, possible due to the very basic nature of the terrain. Some of the G&A scenarios are more skirmish based or modern (ie helicopters) and so are of little value to myself.
DeleteA great looking game Steve, like others have already said, I thought the blues had had it at one point, but it turned into a lot closer game than I thought it would. A very enjoyable read, thanks!
ReplyDeleteThanks Ray and glad you enjoyed it:)! Always nice when a game swings to and fro, to keep us on our toes.
Delete