I've had this scenario prepared for quite sometime now, but just didn't feel in the mood to play it, given I was devoting most of my time to the France 1940 Campaign. However the weather put pay to any priming of troops for the campaign and with the weather set poor for at least a week, it seemed a good opportunity to get some games in.
 |
| We had about 2" of snow overnight which was not bad, but not too far away they had 6" - 8" on the tops of the Mendips. Far too cold for priming unfortunately. |
Blue OOB
3 x Line Infantry
1 x Light Infantry
2 x Cavalry
Red OOB
3 x Line Infantry
2 x Light Infantry
1 x Artillery
Scenario Objectives
The Blue Force is returning after raiding Red territory, but is faced by a Red blocking force on the road. Blue is unaware the other Red units are close by.
Blue Force to exit 3 Units off the table.
Blue Force can only exit via the road at the Southern table edge.
The Game
As is my usual practice I got everything set up the night before so that I could make a leisurely start once the morning chores were out of the way. I had no fixed Turn limit in mind, but a maximum of 8 Turns felt right. I'll let the captioned photos tell the story of the game.
 |
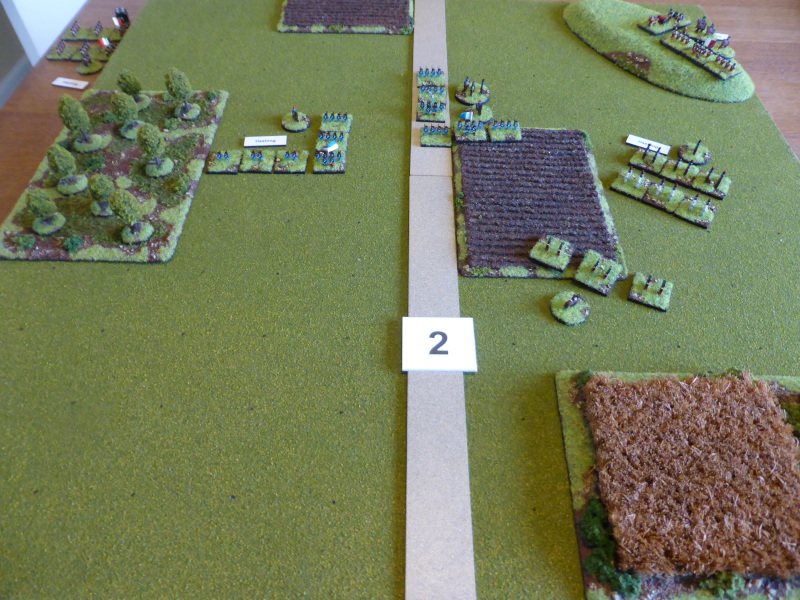
| An overview of the baord, with the lone Red Light Infantry blocking the road. |
 |
| Another Red Light Infantry unit would be able to arrive on Turn 6. |
 |
| The Red flanking force to arrive on Turn 2, but with a Dithering commander. Fortunately I attached the CO before rolling for commander quality. |
 |
| The other Red flanking force to arrive on Turn 4, but with a Dashing commander. |
 |
| The Blue right flank had a Dashing commander, whilst the Centre was Dependable, but with the CO would count as Dashing. |
 |
| The Blue left flank composed of their Cavalry and with a Dashing commander too. |
 |
| The end of Turn 1. The Blue force didn't move too quickly, despite having Dashing commanders all round. The Red Light Infantry held their position. |
 |
| The Blue Cavalry acting as flank protection whilst the Centre moved down the road. |
 |
| On the right the Blue Light Infantry moved to screen the woods as they advanced. |
 |
| The end of Turn 2. The Blue force moved more swiftly this Turn, forcing the Red Light Infantry to move towards the Cavalry to try and block a quick and easy escape route. The Red flank force appeared over the hill, but its shooting failed to hit its mark. |
 |
| The Red Light Infantry feeling like King Cnut trying to stem the tide. |
 |
| The Blue troops in the Centre get a surprise as shots whizz over and around them. |
 |
| The end of Turn 3. The Blue Force deploys one Line Infantry unit to meet the threat to its flank, whilst all other units push forward as quickly as they can. The Red Light Infantry wisely retreat back to the road, trading space for time. |
 |
| The Red Light Infantry hope they can hang on long enough for reinforcements to arrive. |
 |
| The Blue Line Infantry unit take incoming fire but managed to rally a hit off to maintain reasonable combat effectiveness. |
 |
| The end of Turn 4. The Blue Force continues to push forward to try and close with the Red Light Infantry blocking their escape route. As Red reinforcements arrive, the Blue Line Infantry in the Centre begin a fighting withdrawal. |
 |
| Enemies to the right of me... |
 |
| ... enemies to the left. |
 |
| Neither side can gain a decisive advantage, despite some good shooting. |
 |
| Can the Red Line Infantry march quickly enough to prevent the Blue Force from escaping? |
 |
| The end of Turn 5. The Blue Force closed in for what it hoped would be the kill on the Red Light Infantry, whilst the Blue Line Infantry continued their fighting withdrawal as the Red troops pushed forwad to help the beleagured unit on the road. |
 |
| Some how the Red Light Infantry just held on. |
 |
| The Blue Line Infantry continue to hold back the Red Line Infantry. |
 |
| Turn 6 and Der Hexenkessel. As the Blue Cavalry charges the Red Light Infantry, who manage to turn to face, the Red Light Infantry arrive to surprise the Blue Force. The fighting is confused with no real space for manouevre for the Blue Force as the Red Force closes in. |
 |
| Can the Blue Cavalry sweep away the Red Light Infantry> |
 |
| The Red Light Infantry appear in the flank of the Blue Line Infantry as Blue Light Infantry move to cover the Red Line Infantry who are advancing in Line. |
 |
| The end of Turn 6. The Blue Cavalry make short work of the Red Light Infantry, opening up an avenue of retreat at last. The Red Infantry cannot quite get enough hits to force the Blue troops to rout, although one Blue Line Infantry unit does have to retreat to reform. |
 |
| The Blue Line Infantry from the Centre that have been delaying the Red Force finally have to retreat to reform. |
 |
| The road is now open, but can Blue take advantage of it? |
 |
| The Red Light Infantry just fail to cause the Blue Line Infantry to fall back to reform. |
 |
| The Red Force still pushing on hoping to stop the Blue Force. |
End of Game
A close run thing but on Turn 7 Blue managed to extracate 3 units from the tightening noose and thereby gain victory, but most likely a Pyrrhic one at that.
Post Game Thoughts
Well that pretty much came down to the wire, something that I didn't expect around Turn 3, when I thought it was going to be a walk in the park for the Blue Force. How wrong one can be! It was great to get Honours of War onto the table after so long and as alway sit provided a very enjoyable game. As always some post-game thoughts in no particular order:
- The random allocation of commander quality worked well and I prefer this to knowing in advance what they will be like. This also greatly adds to the fun of solo play.
- As both sides had an above average amount of Dashing commanders, their faster movement on Admirable or Inspiring command rolls certainly helped the game move along at a fair old lick and neither side was too slow compared to the other. If say Blue had lots of Dithering and red Dashing, then it would have been a very different game.
- The 2' x 2' table was a perfect size for HoW with its smaller movement compared to BPII. I deliberately wanted this more steady movement as I felt the generous movements rates of BPII would have unbalanced the game.
- Once again the 3 base units helped give just enough space on the small table for some movement and manoeuvering.
- Limiting the exit for the Blue Force to the road only gave the Red Force a fighting chance. If it had been anywhere along the Southern edge, then the Red Cavalry could have escaped very easily and likewise enough of the Blue Infantry.
- I could have had the Red Light Infantry move back early on to the road edge, but I wanted them to try and keep the Blue Force 'bottled up' for the Red flanking force that arrived on Turn 2 to have a chance to start making its presence felt. I think this approach worked well but could have been better if the Red shooting had been more effective at the start.
- The Blue Cavalry could have charged the Red Light Infantry early on and would probably have either forced them to flee back of routed them in close combat. Either way they might have been able to clear the road sooner for the Blue Force.
This has been one of the better scenarios I've played, possibly due to the above that gave a good and balanced game. I think there is plenty of replay value in it to see how things might unfold taking the points above into account.
I don't have any other games planned just yet, but most likely another OHW scenario might make it to the table or a generic bigger scale one, depending upon time and motivation. I hope to get some more painting in, but this is most likely going to be on my mid-19thC ImagiNations troops given my priming issues due to the weather.
TTFN.


Great report Steve. That turned into a tense engagement in the end. A case of don't count your chickens...
ReplyDeleteThanks Richard and it was too close to call at the start of Turn 6. Certainly a case of waiting till the fat lady sings...
DeleteThe battle turned out much closer than I initially anticipated. Towards the end things seemed rather confusing - as the opposing forces crowded closer and there was just “so much going on” almost simultaneously - but I suppose that’s where the Generals earn their pay, making critical decisions with serious implications.
ReplyDeleteHas your washing line been up since last year or are you already able to put washing out on the line? 😎😅
Cheers,
Geoff
I certainly expected it to be very one sided early on too Geoff. At the end it lost all semblance of Linear Warfare due to the nature of the scenario. Still great fun to play.
DeleteToday was the first day for months we haven't been able to dry our washing on the line, due to the rather dry Winter we've had. I must admit I do love that really fresh smell you get on clothes dried on a cold day. My wife hates it though!
Red’s light infantry were certainly a thorn in Blue’s plan.
ReplyDeleteThey certainly were Peter. I did ponder putting Line Infantry in their place for a bit more staying power and better shooting, but plumped for the better mobility and harder to hit of the Light Infantry.
DeleteGreat looking report sir!
ReplyDeletebest regards
Many thanks Michal and glad you enjoyed it:).
DeleteSteve, you pack a lot of action into a small space. As I read through your battle report, the tactical situation seemed very familiar. I thought you were playing Thomas' Scenario #6 Flank Attack. I had to grab my copy of the book to verify. Scenario #13 seems a close cousin to Scenario #6. Enjoyable report!
ReplyDeleteThanks Jon:). The 2' x 2' table equates to 4' x 4' with larger scale figures, so not too bad really. Certainly with the shorter HoW movement rates it is perfectly fine. Some of the scenarios are very similar and I know I did skip one as I'd played it before and it was too close to the next scenario to bother playing.
DeleteNice one. I especially appreciated the Cnut reference.
ReplyDeleteI’m also having issues with the weather interfering with my ability to prime miniatures. 😀
Thanks Stew and glad you liked the Cnut reference:). We have had a good Winter and now the weather has turned as we have entered Spring, which is rather unusual for where we are. It has been a funny year weather wise so far and a real pain that I can't prime for at least a week looking at the forecast.
DeleteThere are loads of great OHW scenarios...but #13 may well be the best of the lot! It is structured so well to make it challenging for both sides right up to the end.
ReplyDeleteOn paper I didn't expect this to be such a good challenge for both sides and was very glad to be proved wrong. I can see this getting some replay at some point in the future.
DeleteHooray for snow! :-) I note the Napoleonic Clash of Eagles supplement (for Black Powder) also use the `glory Hallelujah limit of no fire if moving more than once … so perhaps it could also be used for SYW.
ReplyDeleteI love snow and we get it so rarely here in Bristol it's always a pleasure to see, except when you want to prime of course;)! In HoW there is a -1 penalty to the dice roll is you have moved, so that is sort of factored in. This makes it tricky at times for the Attacker as they close range to be able to shoot.
DeleteLovely report, and yes, #13 is a great scenario. A lot seems to depend on what troops the defender is allocated and where they arrive. Really admire your mdf armies 👍🏼👍🏼👍🏼👍🏼.
ReplyDeleteThanks Martin. Certainly depending upon the troop types available will dictate somewhat the deployment and tactics, which naturally really adds to the replay value. I'm glad you like the mdf armies and they are perfect for generic forces to play quick pick up games etc. This allows me to paint more at my leisure but still get games in.
DeleteNicely done Steve I need to seek out that scenario book sometime
ReplyDeleteThanks Matt. As so many others have said, the book is worth it just for the 30 scenarios it contains. The rules don't work for me, but I can't fault the scenarios.
DeleteA great looking table and figures on display they Steve...great work!
ReplyDeleteThanks Keith and glad you enjoyed it:).
DeleteHi Steve...You clearly enjoyed this game and it looks real nice too... We have a retractable washing line but it has not been used for 20 years...the tumble dryer rules even in high summer...I do not interfere in such issues... not in my remit... !!!!!!!..Lots more snow up here today but melting already...such a funny winter...Regards.
ReplyDeleteThanks Tony and it was certainly a fun game and much more of a challenge for both sides than I initially thought.
DeleteI hate tumble dryers, but not as much as I hate dishwashers!
A great looking very close game Steve.
ReplyDeleteMany thanks Ray:).
DeleteA nifty little fight, Steve, thanks for posting!
ReplyDeleteV/R,
Jack
You're welcome Jack:).
DeleteGreat looking game Steve, I know what you mean about the weather, I have been wanting to spray varnish a bunch of stuff for what feels like months.
ReplyDeleteCheers
Stu
Thanks Stu! Luckily yesterday turned out warm enough for some quick priming which was good. I brush on my lacquer to avoid wastage and to prevent blooming, which is where the lacquer turns milky as it traps moisture in the air as it dries.
Delete