After quite a hiatus on the campaign front, I felt in the mood to get this back up and running, so after re-acquainting myself with where the campaign had finished on Day Two, it was time to decide upon which scenario to play. So after a bit of thought I plumped for the combined Fallschirmjager, Volkstuurm and Panzerschule attack towards the bridge, with the aim of cutting and/or disrupting Club Route.
German OOB
1 x CO (CV9)
1 x FJ HQ (CV8)
3 x FJ
1 x MG
1 x 81mm Mortar
1 x Volkstuurm HQ (CV7)
3 x Volkstuurm
1 x MG
1 x 81mm Mortar
1 x Panzerschule HQ (CV8)
1 x Pz II
2 x Pz III 50mm Lang
1 x Pz IV Short
British OOB
1 x FAO (CV8)
2 x 25 pdr Batterys
1 x 'A' Coy HQ (CV8)
3 x Infantry
1 x MG
1 x 'A' Sqdn HQ (CV8)
3 x Shermans
1 x Sherman Firefly
1 x 2nd Recce HQ
2 x Armoured Cars
2 x Infantry
Scenario Details
Quite simply for the Germans to cut the road and inflict as many losses as possible, whilst minimising their own. The British had left a decent covering force in place to defend the road junction and approaches to the bridge.
Weather - Mist
-1CV and visibility down to 50cm. No Air Support available.
The Game
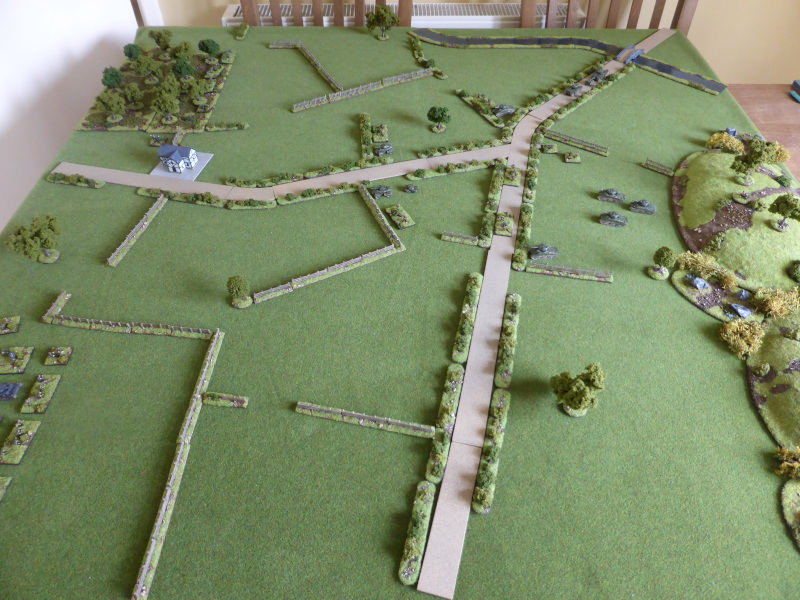 |
| An overview of the table, with the British to the right, on and around the road junction. The Germans to the left, with the Volkstuurm in the woods and FJ and Panzers across the road. The German plan was to try and creat a diversion with a limited Volkstuurm attack, whilst the FJ & Panzers mounted the main attack from their right. |
 |
| 'A' Coy dug-in along the hedgeline of the road, with Shermans in support. A Firefly and Sherman were kept back as a mobile reserve. Note the AVRE's (top right) en route to support the attack on Pemba. |
 |
| 2nd Recce in postion observing towards the farm for signs of any German movement. |
 |
| The main German strike force in position and ready to move off. |
 |
| Likewise for the Volkstuurm. |
 |
| The end of Turn 1. The Germans got off to a bad start, with the Volkstuurm failing to move, likewise the FJ, but at least the independent Pz III's moved up to the fence. The British couldn't see anything through the mist, but could hear the Panzers moving, but could not be sure if they might be British or not, so they held their positions. |
 |
| The end of Turn 2. The Volkstuurm moved off out of the woods and were spotted by the 2nd Recce, who managed to suppress one Volkstuurm unit in the open. In response the Volkstuurm MG & Mortar opened fire and suppressed a Recce Infantry unit. On the right, the FJ and Panzers continued to advance under the cover of the mist. The 2nd Recce, having a perfect opportunity to attack the Volkstuurm, failed their command roll (this was to be a recurring theme). With no targets in sight, the British stood too and moved up the reserve Shermans in support, in response the shooting to their right. |
 |
| The Panzers advance and the British respond, but neither side can see each other yet. |
 |
| The Volkstuurm move off and come under fire, but respond rather too effectively for the 2nd Recce infantry. |
 |
| The Sherman and Firefly move up in response to the gunfire and the sound of armour advancing on the left. |
 |
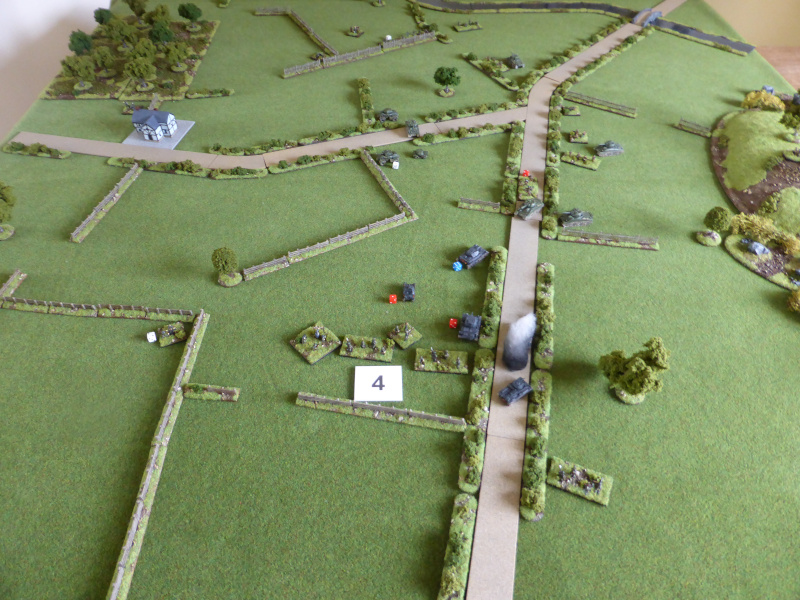
| The end of Turn 3. Well the Volkstuurm were playing a bit of a blinder, as they managed to KO a 2nd Recce Infantry unit and move up under cover of the mist to threaten the British right flank. On the right the Panzers crossed onto the road and again threatened the British left flank. The FJ took the attack to the remaining 2nd Recce Infantry unit, but failed to suppress it. The 2nd Recce Infantry unit used some Initiative movement to pull back to another fence line to avois being caught in the flank. Then right across the board all British HQ's failed their command rolls! A certain corporal Jones from 1st Platoon, 'A' Company could be heard to cry out; "Don't Panic!!!" |
 |
| The German Panzers arrive on the British left flank and a paralysis seemed to decend upon the British, somewhat surprised at their emergence from the mist. |
 |
| The Volkstuurm sneak up on the unsuspecting British right flank. |
 |
| The Shermans and Infantry fail to see anything through the mist. |
 |
| Lots of targets but they failed to capitalise on the opportunity in front of them. |
 |
| The end of Turn 4. The Volkstuurm moved up quietly and one Infantry unit crossed into the open to spot one of 'A' Coys platoons, but then failed their command roll. On the right the Panzers suppressed another of 'A' Coys platoons, then hit the 2nd Recce Armoured Cars but failed to KO them. The FJ and their supporting Panzers KO the remaining 2nd Recce Infantry unit and then advanced forward. In response a Sherman managed to suppress the FJ MG. Finally the FAO had line of sight to some targets and his artillery strike suppressed the Panzers HQ, a Panzer III and KO'd the other one. The Shermans engaged the Panzers, who returned fire, with both sides making some amazinf armour saves to stay in the game. At least the Firefly forced the suppressed Panzer III back. |
 |
| Both sides armour becomes hotly engaged, but to limited effect. |
 |
| The Panzer IV and a Sherman both took 5 hits a piece, yet both saved all of them! What are the chances? |
 |
| A Sherman reacts to the emergence of the Volkstuurm Infantry, but fails to shoot. |
 |
| The end of Turn 5. The Volkstuurm again had a rather decent Turn, with some brilliant shooting they KO'd the 'A' Coy platoon on the right flank. The Sherman at least managed to suppress the Volkstuurm Infantry in the open and force them back slightly. On the other flank, with some Panzers suppressed, the remaining few caused little damage to the Shermans, but the Pz IV was suppressed by opportunity Fire. With some many targets to the fore, the British FAO managed to call in his artillery right on top of the FJ & Panzers, KO'ing two FJ Infantry and suppressing two HQ's and the remaining Panzer III. From there the Shermans finished off what was left of the German armour and on the right flank the Sherman KO'd a Volkstuurm Infantry unit as it failed its Fallbacl roll. |
 |
| The burning wrecks on the Panzers. |
 |
| And the Shermans that finished many of them off. |
 |
| Another view of the carnage and also of the 2nd Recce Armoured Cars that failed to move at all. |
 |
| The Volkstuurm still in position. |
 |
| The Shermans that did so much damage in the end. |
End of Game
With the loss of all of their Panzers and most of the FJ Kompanie, the Germans were spent as an attacking force and so wisely retreated back into the mist. The British were in no position to pursue, given their losses and their orders to protect the bridge and Club Route.
Casualties
The Germans lost 1 x Volkstuurm, 2 x FJ, 1 x Pz II, 2 x Pz III and 1 x Pz IV
The British lost 2 x Recce Infantry and 2 x Infantry.
Post Game Thoughts
It was nice to resume the campaign after quite a break. I did think at one point that the Germans might have cut Club Route, given the poor British response mid-game, but the FAO and Artillery came to the rescue, which was a rather historical outcome. So as always a few thoughts on the game:
- I must admit that I was feeling a bit under the weather all day and whilst it didn't affect the game, some of my decisions might have been better with a clearer head. It was a bit of a struggle at times but I did enjoy getting the toys on the table though.
- There were a lot of Blunders in this game, which was rather unusual. Not all of them I recorded but they did break up both sides ability to excerpt C&C. You could blame it on the mist I suppose!
- The British did have more than their fair share of failed command rolls, with the 2nd Recce being a case in point. I don't think they made one successful roll all game! Also on Turn 3 when all HQ's failed really hampered their ability to respond to the German attacks.
- The German mortars as always were rather effective. I know many find them too effective. However recently reading on of Patrick Delaforce's books, in Normandy and into Belgium some 80% of casualties were from mortar or artillery fire. Only in 1945 did this switch markedly to small arms fire. So worth bearing in mind.
- The British artillery once again saved the day and as with the above book, this happened so often in breaking up German attacks throughout the NWE campaign. If they hadn't come to the rescue, then the Germans might have caused more casualties.
- The Germans really missed having some decent armoured support, but then that's part of the fun of this sort of campaign. I did enjoy using the early was armour though, even if they didn't have quite the desired effect I might have hoped for.
- With both sides having taken quite severe losses, this is likely to have quite an impact campaign wise. After the attack on Pemba and following campaign moves, then it will become clearer as to what these might be.
So there we have. Nice to get the campaign up and running again and I hope to get the Pemba attack in soon. A few other things to do before that, but it's nice to have other things to keep one occupied. All being well I even have a FtF scheduled for this coming Sunday. Fingers crossed I remain Covid free!
Until next time stay safe and keep healthy.
Great looking game Steve and some more food for thought for me. When playing solo do you have any special approach ? Or do you find BKC gives enough variability with the command roles ?
ReplyDeleteThanks Matt! Certainly the C&C of BKC does give enough uncertainty to require no special approaches to solo play. I do tend to take on the role of the Attacker, as generally they will need to react more as things do or do not go their way. I'll come up with a rough plan of attack first and try to stick to it. Also I'll think what is a reasonable course of action for either side at any relevant point in the game.
DeleteSo for example, with the Volkstuurm advancing through the mist, out of sight, the British right flank could not react as they had no idea what was happening to their front. Afterall the 2nd Recce had only seen one lone platoon move, so that seemed fair to me.
Overcoming that God like view we all have is not too difficult and I'm lucky that my other gaming chums play in a similar way, as to what could be seen and reacted to etc, ignoring the very obvious (to us) movement on the other side of the hill.
Thanks very much Steve, interesting game - when the British seemed to get caught by surprise in the middle of the action, I did wonder if they were about to get rolled up. Neat looking table too.
ReplyDeleteYou're welcome:). I did fear at one point that both flanks might begin to be rolled up, by as ever the artillery saved the day. Glad you liked the table too. I'm looking forward to Pemba and something a bit more built up, which will give a rather different game I think.
DeleteExcellent report and a super looking game, as always. So many blunders is right. I can’t take it! Early on, I thought Germans were going to sneak away with a victory. That is, until British artillery opened. Gosh, that was devastating.
ReplyDeleteGreat to see you posting regularly again!
Many thanks Jon:). It was one of those rare games that have, over the years, featured so many blunders. Luckily both sides suffered equally. However the 2nd Recce did not blunder but were just useless. I think their commander is being sent to the rear as I type...
DeleteThe artillery certainly saved the British bacon in this case. 12 dice is not to be sniffed at and that's slightly understrength for some games I've played before. But as mentioned re: the Delaforce books, when they called in Uncle and Victor targets on the Germans, the effect was devastating historically. So I tend not to try to over do it on the artillery front, which gives a better game. I might change my tune when trying to take Pemba without its support!
I thoroughly enjoyed that Steve. More power to your elbow! I like the look of your terrain. Looks practical as well as looking good.
ReplyDeleteI'm glad you enjoyed it Chris. Limited space means my terrain has to certainly be practical, but I do try and make it looks as nice as I can and with a consistent look. I'm already thinking on how best to represent the Pemba BUA.
DeleteAs usual Steve - your tabletop battlefield looks excellent and your toys are spot on. You are continuing to “set the bar high”. 👏👍
ReplyDeleteWith regards to the actual battle, I’m not sure there’s anything to be said that hasn’t already been mentioned.
2nd Recce had a woeful performance although, to be fair, many of the British units “had their moments” - but 2nd Recce were really dismal. The limited visibility caused by the mist certainly didn’t help matters. The star performers for the Brits were the FAO & artillery and the Shermans. And for the Germans? Well, the Volkssturm performed well beyond my expectations.
Are your Volkssturm bases just standard, regular German WW2 infantry figures or did you do a mix ‘n’ match to give them an irregular look? From what I’ve read the Volkssturm were armed with whatever was available (which brings its own problems with ammunition resupply etc) and not everyone had much “training”.
Let’s see what happens with things at Pemba. I bet the British are hoping for good, clear weather - and I’m pretty sure the Jerries aren’t.
Good luck with your F2F game (who remembers face to face? Sooo long ago it seems).
Take care & keep safe,
Geoff
Many thanks for your kind words Geoff, much appreciated, as all comments are.
DeleteThe Volkstuurm are my WWI Germans that I use for my AVBCW games. I called them this, but they could easily be the 'ear & stomach' Battalions used at this time in the War. They don't have the same stats as regular infantry and have worse morale, but when the dice Gods are with you, as in this game, this matters little!
Sadly for the British it is mist right across the campaign area, as they were hoping for some bomber and ground support. Let's hope they don't need it.
FtF will be fun and in a nice part of the Cotswolds too. I'm meeting up with a good friend at another gamers for some Honours of War Imagi-Nations gaming. A report to follow in due course with lots of pics hopefully.
Just to clarify Steve - is the campaign set in Germany proper? Or in France/the Low Countries?
DeleteIf the Germans do have (genuine) Volkssturm available then that would suggest it is the Fatherland. If that’s the case I would maybe expect the Germans to fight more tenaciously (especially the Volkssturm as they are defending their “homeland” after all, maybe even their home town). I would perhaps suggest you may want to have a few buildings as “ruins”. By the same token, if the battles are in Germany itself then you could argue the British are more free to use artillery & air-strikes - as you don’t have the worry of upsetting, say, French allies by accidentally damaging their towns.
Of course, if your low quality Germans are indeed from the “ear and stomach” battalions then you could indeed see why they would be less fervent in their defence of French territory.
Cheers,
Geoff
Hi Geoff,
Deletethis is nominally set in the Low Countries, as it was inspired by Operation Market-Garden. IIRC during the actual operation, the Americans were attacked out of the Reichswald by some Volkstuurm, or similar low grade troops, but my memory could be playing tricks on me.
In the aforementioned Delaforce book, some low grade units did really put up a stiff resistance, close to and certainly when in Germany. At other times so called better troops surrendered at the first opportunity.
As for artillery and air strikes, a good point about not wishing to damage occupied towns unless when absolutely nescessary. Certainly once they crossed into Germany they appeared to shell the towns and villages into submission that showed any signs of resistance.
I’d guess that a lot of the older guys in the Volksturm were WWI veterans so had some idea how to handle a weapon and had some fieldcraft at least.
DeleteI was interested in your reference to some of the so-called better quality troops surrendering at the first opportunity. Perhaps they knew what was coming with their experience of Allied air power, artillery and armour (something that the LOC types hadn’t quite had yet). The old Prince de Ligne had something similar to say about veterans versus new recruits.
Some of the Volkssturm would indeed be veterans, but many had little/limited training. By necessity they were armed with “whatever was available” which could include obsolete & captured weapons. Ammunition supplies could be sporadic and there wasn’t really much available for weapons practice.
DeleteAs the Volkssturm were effectively a “home guard” then it is understandable that they would on occasion fight with a fervent desperation - they were defending their homes and families after all - especially if against the Russians.
By the same token, I can see why trained, regular soldiers might be sufficiently “detached” to be able to make an objective decision and withdraw, retreat or surrender depending on the situation they were facing.
Chris and Geoff,
Deletethe beauty of BKC is that you can tweak units to suit certain periods of the war of actions, as you see fit. So SS can be graded as Elite in France 1940, but alos Fragile, to represent them running away when they first went into action. Like wise say Kriegsmarine units could be rated as lower grade but very stubborn, to represent them fighting to the last man almost in 1945.
That was a great report Steve, really well chronicled. I thought the Germans were going to take it half way through. I love the fog of war in the game - both literal and rule related.
ReplyDeleteI'm glad you liked it Richard. It was nice to think that the Germans had a small chance to pull of a win or at least inflict a lot of damage, which is much better than it being a foregone conclusion as it were. The fog of war has worked well so far and I do love the C&C friction that BKC brings to the table.
DeleteAnother great report, as everyone else has said already Steve. The narrative is very believable...I am not sure Volksturm units ever fought in occupied territories but that doesn't really matter, they could just as easily represent some other lower quality troops pressed into service! Artillery and airpower were certainly the deciding factors in the Allies favour from Normandy onwards, so the effect of the British artillery is totally realistic and believable.
ReplyDeleteThanks Keith. The Volkstuurm is really just a catch all phrase for this campaign to represent lower grade troops. Yep, the artillery certainly felt historically right, which is of course a good thing for the Brits.
Delete