Inspiration for a game can come from unlikely sources, a case in point being a post on the horseandmusketgaming Blog about some of the 'old school' authors. Having acquired quite a few of the titles I missed out on as a kid over the past few years, I dug some books out by Grant, Featherstone and Wesencraft for a general and pleasurable perusal one afternoon. I wasn't looking for anything in particular but I was struck by a scenario in Grant's 'The War Game' that I thought would make for a nice little game with my mdf figures.
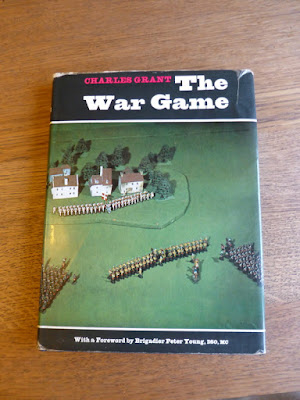 |
Nothing beats an original book, much better than the newer re-prints IMHO.
|
 |
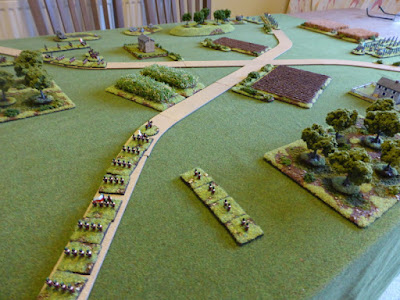
The scenario in question.
|
Black Powder II would be the rules of choice this time around, but the scenario is begging to be played with Honours of War and my wooden blocks at some point in the future. As of late the amendments from the Glory Hallelujah! supplement would be used, as I find this give a good game. Rather than a straight re-fight with the forces listed in the original scenario, I thought I would make one side slightly stronger, but use the 'Untested' rule from BPII to give some uncertainty to how good or bad the troops would be. I wasn't sure how well it would work but was keen to give it a try.
Red OOB
4 x Line Infantry
1 x Light Infantry
1 x Artillery
1 x Cavalry
Blue OOB
6 x Line Infantry
2 x Light Infantry
1 x Artillery
2 x Cavalry
(All Blue units apart from the Artillery would be classed as Untested)
Scenario
Both sides represent Advanced Guards and the objective is to control the crossroads by the end of Turn 8.
Layout
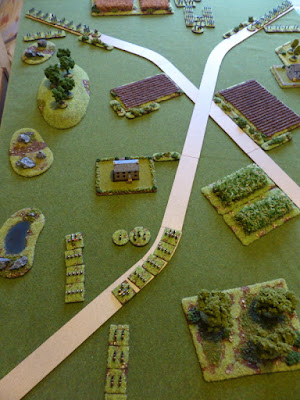
The table was set up as best as I could, with the terrain to hand and of course the map as a guide. I added in a few hedges and fields to help the look of the game as well as providing cover here and there.
 |
An overview of the table, which was 3 1/2' x 2 1/2'. Red is on the left, Blue the right.
|
 |
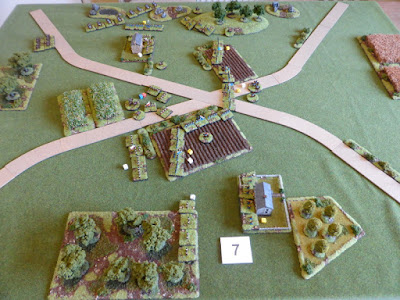
The Blue Centre and Left Flank.
|
 |
The Blue Right Flank.
|
 |
The Red Left Flank.
|
Turn 1
Red won the die roll and chose to go first, moving both flanks forward, still in column of march with only the light infantry deploying into line on the right flank.
The Blue centre and right flank pushed forward and deployed into line, whilst the left flank stayed in column and moved towards the farmhouse, with the light infantry in the lead. Only the right flank was able to shoot, causing hits and disruption on the Red left flank.
 |
The end of Turn 1.
|
 |
The left flank marches on with the light infantry in the woods to their left, with the centre deployed into line.
|
 |
The right flank in line and are able to fire on the Red infantry columns, whilst the light infantry push forward to the wooded hill.
|
 |
The Red left flank caught in column, with the cavalry providing flank protection.
|
 |
The Red right flank march forward with the light infantry pushing on to try and take the farmhouse.
|
 |
A nice view of the Blue left flank marching forward which, when on the table, are not recognisable as mdf figures.
|
Turn 2
The Red flanks deploy into line where possible and open fire on the Blue centre. Two units are hit, with one having a Stamina of 1. Somehow this manages to pass its morale saves and stay on the table, as does the other unit.
The Blue right flank fails its command roll, whilst the centre pushes forward and the left flank forms into line, with the light infantry managing to occupy the farmhouse. What shooting there is only manages to cause a few hits. The cavalry who were expected to follow the advance ready to exploit any gaps, blunder and decide to retire the the table edge.
 |
The end of Turn 2.
|
 |
The Blue light infantry have beaten the Red light infantry to the farmhouse.
|
 |
The Blue left and centre mass and advance forward.
|
 |
The Red left flank, with one unit unable to form into line due to being disordered.
|
 |
The Red right flank formed and ready to meet the Blue mass of infantry advancing their way.
|
 |
The Blue light infantry on the right flank are ready to surprise the Red left flank.
|
Turn 3
The Red infantry are now all in line formation and advance here and there to try and form a solid line of defence. The light infantry wisely withdraw into the woods and open fire on their counterparts in the farmhouse, who turn out to have a Stamina of 1. Other shooting sees Blue once again making some good morale saves, but do take some disorder.
The Blue right flank manages to receive its orders and pushes the light infantry forward in the woods ready to enfilade the Red infantry by the hill, whilst a unit or line infantry moves past the hill to try and turn the Red left flank. Shooting from both the line and light infantry sees the Red infantry unit fails its break test and flee the table.
In the centre the infantry and artillery cause one hit and disorder on the Red artillery, whilst the left flank manages passage of lines to advance through the infantry in the centre. The light infantry in the farmhouse hit the Red light infantry in the woods and cause disorder too.
 |
The end of Turn 3.
|
 |
The left flank manage passage of lines as the light infantry shoot into the wood.
|
 |
The cavalry rejoin the fray so to speak and await an opportunity to advance and exploit.
|
 |
The Blue right flank.
|
 |
The light infantry cause mayhem from the wooded hill as line infantry pass by to threaten to turn the red left flank.
|
 |
The Red infantry break after being caught in a withering cross fire.
|
 |
The view from the Red positions.
|
Turn 4
With the Red left flank under pressure, the infantry had little option but to withdraw into the farmhouse to try and keep their position secure, with the cavalry still providing support. The right flank held their line and shooting finally saw the Blue Stamina 1 line infantry unit break.
As the Blue right flank continued to try and turn the Red left flank, elsewhere there was little movement and the cavalry failed their command roll. The shooting was across the line was pretty ineffective, except for the destruction of the Red artillery unit.
 |
The Blue line infantry breaks, having only a Stamina of 1.
|
 |
The stalled Blue left flank and centre.
|
 |
The Red artillery unit is destroyed.
|
 |
The blue right flank in position to turn the Red left.
|
 |
The view from the Red positions.
|
Turns 5
Having come under fire, the Red cavalry moves back out of range, but still in position to provide support to the farmhouse should it be required. No other units moved and another Turn in which the which the shooting was ineffective as the Blue units once again managed to pass many morale saves.
For Blue the right and left flanks pushed forward as the centre failed their command roll and the cavalry seeing an opportunity, moved right ournd the hill to support the right flank. The shooting managed to cause some hits and disorder, with the former beginning to stack up on some Red units.
 |
The end of Turn 5 (note I forgot to change the Turn marker on the table).
|
 |
The Blue left flank is beginning to put the Red line under pressure.
|
 |
A view from the Red right flank.
|
 |
The Blue right flank is beginning to turn the Red left flank.
|
 |
The Blue cavalry ready to exploit into the Red rear areas.
|
Turn 6
The Red units held position due to most units being disordered. Their shooting managed to cause some hits and disorder, but again Blue made many morale saves.
The Blue units closed up to within close range where possible as the cavalry moved pass on the right flank, ready to charge their Red opponents. The shooting was much more effective, with combined infantry and artillery fire seeing another Red line infantry unit break and flee the table.
 |
The end of Turn 6 (note I got the wrong Turn marker out!)
|
 |
The light infantry Mexican stand off again. Despite having only a Stamina of 1, the Blue light infantry are still holding on due to poor shooting and good morale saves.
|
 |
Another Red line infantry unit breaks.
|
 |
A solid Blue line of infantry.
|
 |
As the Red infantry breaks, there is only one Red infantry unit against four Blue.
|
 |
The Red cavalry look nervously on.
|
 |
The Red infantry stubbornly defend the farmhouse.
|
 |
A view from the Blue right flank as they have turned the Red left flank.
|
End of Game
With the loss of another line infantry unit, the Red position was untenable and so they quit the field of battle, leaving the Blue advanced guard in control of the crossroads.
Post Game Thoughts
In the end a rather easy vicotry for the Blue team, but early on it could easily have gone the other way. Once again BPII with the GH! supplement rules gave a great solo game and I'm really enjoying playing games with these rules. So as always some post game thoughts in no particular order:
- I think Blue had the die Gods on their side this game as they seemed to get the better of the morale saves when it really mattered. The Red side over all had better shooting, causing more hits, but Blue seemed to be able to save them when it really mattered.
- The cavalry had little to do once again but, as mentioned before, fits in perfectly well with warfare in Europe from the 1840's onwards. This scenario didn't really give them opportunity to exploit, not helped by playing down the table rather than across.
- Overall I thought the scenario was a good one to play and comfortable fitted onto our dining table with room for books, die etc. Scaled up the game was the equivalent of 7' x 5', so plenty big enough. As menioned above, playing across the table would have been better, but my increase in the forces on one side did hamper movement, so I can't complain.
- Using the building rules from the Glory Hallelujah! supplement worked better and the BUA's didn't feel completely impregnable, so I will be using these going forward as they give a better game.
- I enjoyed using the Untested units rule, as two units ended up with Stamina 1 and one with Stamina 2. This adds a nice level of uncertainty to the side with the numerical advantage and had the morale saves not been so good, may have turned the tide in favour of the Red side. Another option is to use the Freshly Raised rule, which I may try in another game, but I think I prefer the Untested rule.
- The Blue side had about twelve units which as many gamers have found, is a nice level for most games and certainly works really well for solo games. The Blue forces are past this level which gives me options force wise, with the Red forces catching up once I get back to the painting table.
So what next, aside from focussing on painting up the Red team for other games? I've some ideas but with our daughter hopefully back from Uni on Monday, I'm not sure how much time i will have as she has some exams to do from home. I have some ideas which I will flesh out in another post soon. Until then keep healthy and stay safe!


Hello there old chap,
ReplyDeleteThat was a cracking action and no mistake! I really like the look of the MDF figures and seeing how looked in action has really given me something to think about. I reckon they would fit in well with my ACW ships for sure!
You cannot beat old school books for scenario ideas and your execution of this was outstanding!
Well done that man!
All the best,
DC
Thanks David and I'm glad you enjoyed the AAR:). The mdf figures would certainly fit in very well aesthetically with your mdf ships, with an added gloss coat of lacquer for good measure. The old school books have lots of useful info and ideas in them that I think we often forget, given the multitude of rules available today. I'm certainly going to be going through them for inspiration over the next week or so.
DeleteNice game Steve, with the BP delivering as always, it definitely plays better when some of the special rules / attributes are added into the game. Looks as though most of the time, the troops were behaving getting their orders through.
ReplyDeleteI do like the ‘old school’ black and white sketch maps, there is obviously something nostalgic about them, but I also think they had to work harder at conveying information compared to todays maps that enjoy the advantage of colour.
Thanks Norm. I actually prefer the simple B&W old school images, but maybe that's just me and my design background. I tend to find todays maps a tad too fussy on the whole. Still each to their own.
DeleteSteve, had you not announced that you were using your MDF armies, I don’t think I would have known. At this scale 2D looks like 3D to me. Blue really had a very easy time of it, I think. Enjoyable action and I hope you can return to a game soon. Thank you!
ReplyDeleteYou're welcome Jonathan. It's only when you pick the figures up you tend to remember they are 2d and mdf, due to the weight (or lack of) and that they feel flat, even though they have some surface detail. Plans are afoot for another game soon, all being well.
DeleteNice work Steve, the figures and terrain look great and the scenario gave a challenging encounter although I thought the "untested" Blues might have had a few more disadvantages - but as you say, the dice Gods seemed to be smiling on them!
ReplyDeleteThanks Keith. Well the idea was for the 'Untested' rule to hamper the Blue team, but the Die Gods deemed otherwise!
DeleteAs ever really nice terrain and those MDF have breathed new life onto the table top. Going back to old skool gaming, with new(ish) rules, is refreshing.
ReplyDeleteThanks Dave and I'm really happy with Walt's figures. Re-reading some of the 'old school' books gives a nice perspective on 'modern' ones as well as plenty of ideas to tack onto to games, scenarios etc.
DeleteThe MDF figures are very effective and it is always enjoyable reading through some of the older wargaming books.
ReplyDeleteI agree wholeheartedly with both your comments:)
DeleteHow interesting I was looking through Featherstone's War Games book and was thinking about playing some of the rules and scenario's in it. As always Steve a great looking game and nice to see the toys on the table.
ReplyDeleteThanks Stu. It seems quite a few fellow Bloggers are delving into their 'old school' collections for ideas and inspiration. Wesencraft's rules keep tempting me...
DeleteSteve realised I wasn’t following as I had mixed up different Steve’s anyway I have rectified and will follow with interest 😀
ReplyDeleteNo problem Matt and glad it is of interest to you:)
Delete