Well the fact that we have actually had some real Summer weather this year, plus a few other factors, have seen my interest in any form of wargaming fall to zero over the past few months. However I do always continue to think about wargaming and read military history books etc so all is not lost when away from the wargaming table.
So one of these thoughts took shape in the form of a 'what if?' game based around what might have happened if Britain and France had invaded Germany in September 1939. As it happened the French only mounted at limited invasion of the Saar which achieved very little. The German High Command after the war said that if the British and French had attacked, they could have defeated Germany within 4 weeks of invading. The reasons why they did not invade are varied and complex, yet from my knowledge of the period it appears to me that it was a massive missed opportunity to defeat Germany at the very outset of the war.
So below is my 'alternative' history to the build up to the German Invasion of Poland and the start of the Second World War. By and large the following is all based upon historical events with a few fictional ones thrown in purely for my 'what if?' wargame.
The March to War 1939
March 31st.
In response the Germany's defiance of the Munich Agreement and the occupation of Czechoslovakia, the United Kingdom pledged the support of itself and France to gaurantee Polish independence.
"... in the
event of any action which clearly threatened Polish independence, and
which the Polish Government accordingly considered it vital to resist
with their national forces, His Majesty's Government would feel
themselves bound at once to lend the Polish Government all support in
their power. They have given the Polish Government an assurance to
this effect. I may add that the French Government have authorised me
to make it plain that they stand in the same position in this matter
as do His Majesty's Government."
April 6th.
The gaurantee was formalised as the Anglo-Polish military alliance during a visit by the Polish Foreign Minister.
May 4th.
"Why
Die for Danzig?"
An article in the Parisian newspaper L'Oeuvre by Socialist writer Marcel Deat argued against Frenchmen being called upon to die for Poland.
July 14th 'Bastille Day'.
Widespread demonstrations take place to show solidarity with Poland and against the sentiments of Marcel Deat under the call of "Egalite, Liberte, Fraternite".
August 12th.
A vote of no confidence in the Chamberlain administration is successfull. Chamberlain resigns and the King asks Churchill to form a cross party administration.
August 23rd.
Britain starts mobilization and units of the BEF are secretly entrained to UK ports ready for departure.
26th August.
France begins mobilization, which is completed by September 1st.
September 1st.
Germany invades Poland. German 1st Army takes up defensive positions along the border with France.
September 3rd.
Britain declares war on Germany. Churchill addresses the Nation as follows:
"I am speaking to you from the cabinet room of 10 Downing Street. This morning the British Ambassador in Berlin handed the German Government a final note stating that, unless we heard from them by 11 o'clock that they were prepared at once to withdraw their troops from Poland, a state of war would exist between us. I have to tell you now that no such undertaking has been received, and that consequently this country is at war with Germany."
France declares war later the same afternoon.
September 4th.
BEF forces disembark in France.
September 6th.
BEF forces arrive at the front.
September 7th.
Anglo-French forces begin the Saar offensive. Units of the German 1st Army begin to retreat in the face of overwhelming force to the pre-prepared Siegfried Line.
September 8th -11th September.
Anglo-French forces continue to make limited headway and in places breakthrough the Siegfried line. The German 1st Army's request for reinforcements are finally heeded as the Anglo-French forces threaten to break out into the Ruhr, at the expense of the campaign in Poland. The Polish forces manage to stabilise the front due to the opening of the 'Second Front'. Russia reneges on her plan to invade Poland, instead coming to her 'aid' and pushing on towards the German border...
Scenario 2. Assault
I would be using this scenario straight from the rulebook as the basis for my game. It fitted in with the above background nicely as well as the painted figures at my disposal. The only slight tweaks I made were as follows:
- The British battlegroup has complete air superiority as the majority of the Luftwaffe is still involved in the Polish campaign. Any Luftwaffe units stationed in the West have been overwhelmed by the French and British airforces.
- Field defences for the German battlegroup are limited to trenches, gun pits, wire and marked minefields.
Order of Battle:
British Battlegroup
2nd Battalion 'The Glosters', 8th Infantry Brigade, 3rd Infantry Division.
Elements of 23rd Field Artillery Regiment and 20th Anti-Tank Regiment.
12th Lancers (Morris AC)
15th/19th Hussars (Vickers MkVI and Cavalry)
7th RTR (Matilda I)
105 Squadron RAF (Fairey Battle)
139 Squadron RAF (Bristol Blenheim Mark IV)
German Battlegroup
2nd Battalion, 355th Infantry Regiment, 214th Infantry Division (reserve).
1st Company Pioneer Battalion 214.
2nd Battalion, 355th Infantry Regiment, 214th Infantry Division (reserve).
1st Company Pioneer Battalion 214.
Deployment
The German troops deployed in and around the small former spa village of Bad Muhn-Reisen, which sat across an important rail and road junction between a range of hills and low ridges. The ridges were inaccessible to all forms of vehicles and AFVs due to their rocky nature. The troops were well dug-in along the railway line as well as the outskirts of the village.
The British split their forces into two, the 15th/19th Hussars deploying on the northern most road, with the Glosters either side of the railway line. The CO deployed on the southern most road with the 7th RTR and the Gloster's battalion assets.
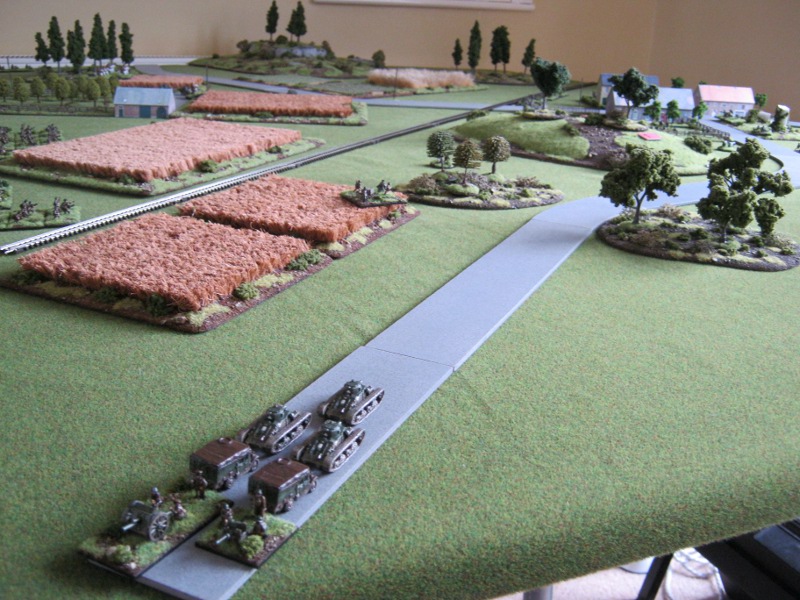
 |
| An overall view of the battlefield, with the Germans at Bad Muhn-Reisen on the right and the British on the left. |
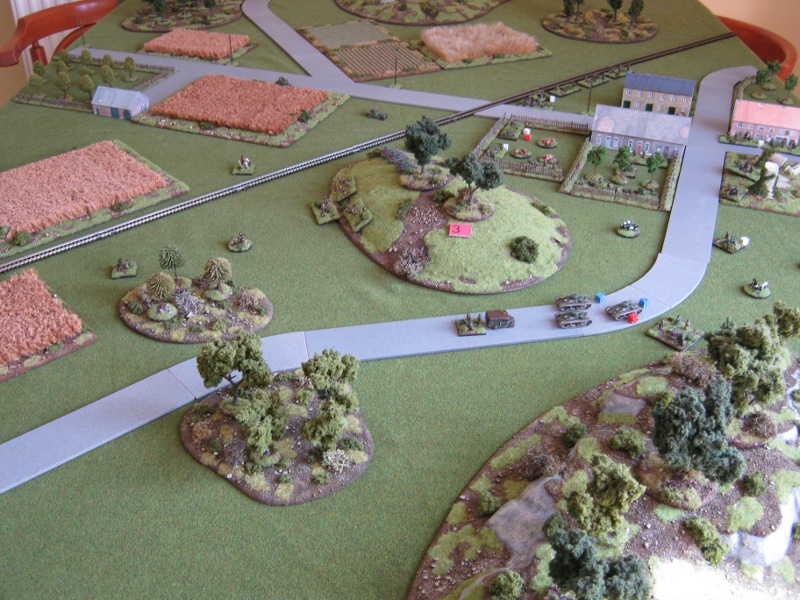
 |
| German deployment in and around the village. |
 |
| The British troops along their mobile deployment zones. |
Turn 1
The 12th Lancers (Recce units) started the game badly, failing to get through to any of the HQs. The Glosters followed their lead and were still on their way to their jump off points. The Donkey Wallopers, or 15th/19th Hussars and the CO led the way on either flank.
The Germans with no targets within range, sat in their trenches laughing quietly at the British ineptitude.
 |
| The battlefield at the end of the turn. |
 |
| The CO arrives with the 7th RTR Matilda Is, plus elements of the 23rd Field Artillery Regiment and 20th Anti-Tank Regiment. |
 |
| The 15th/19th Hussars cavalry, Rolls Royce armoured cars and Vickers MKIV Light Tanks advance on a braod front towards Bad Muhn-Reisen. |
Turn 2
The sound of planes was heard above the advance of the tanks and armoured cars as the Fairey Battles of 105 Squadron arrived, closely followed by the Blenheims of 139 Squadron. Both flights of planes flew through the ack-ack relatively unscathed, to drops their bombs on the Germans. However the effect was slight due to the Germans being well dug-in, but 3 units were suppressed, including the CO.
The 18pdrs of the 23rd Field Artillery Regiment then laid smoke to cover the advance of the 15th/19th Hussars. The 12th Lancers got through this time, but still the Glosters were reluctant to join the fray, with only the support company advancing from its jump off point.
The 15th/19th Hussars made the most of the smoke screen and advanced with speed to the hill in readiness for the attack on the village. The CO followed up on the right flank with the 7th RTR and support units advancing in braod parallel with the cavalry on the left.
Due to the smoke screen, the Germans had no targets and so once again were forced to sit and wait.
 |
| The Fairey Battle makes its low level attack run. |
 |
| The Bristol Blenheim bombs from a higher level. |
 |
| The 23rd Field Artillery Regiment accurately lay down their smoke screen. |
 |
| The battlefield at the end of the turn. |
 |
| The 7th RTR lead the way. |
 |
| The 15th/19th Hussars mass for the attack. |
Turn 3
The 23rd Field Artillery regiment switch from smoke to HE, and target the pig filed on the outskirts of Bad Muhn-Reisen, but only suppress 1 infantry unit. The 12th Lancers again play their part, this time allowing the main body of the Glosters to arrive, only for the HQ to blunder and promptly leg it before he has even arrived! The rest of the Glosters move rather slowly, leaving the cavalry and tank units distinctly light on infantry support.
The 15th/19th Hussars press on with the cavalry dismounting and the Vickers MKIV Light Tanks and RR ACs opening fire on the Germans, but to no effect. The HQ then blunders and copies the Glosters HQ by moving back towards his jump off point, but fortunately not too far away from his units.
The CO meanwhile continues to push forward with the Matildas engaging with the German Pak36. The duel develops in the German turn with both sides taking hits and 1 Matilda becoming suppressed.
The German right flank fails its command roll, but on the left the 18pdr artillery support unit is destroyed by MG fire before it has chance to deploy. The CO orders the Assault Engineers to move from their reserve positions towards the left flank to meet the developing threat.
 |
| The battlefield at the end of the turn. |
 |
| The firefight develops between the Matildas and Pak36. |
 |
| The 15th/19th Hussars take the fight to the Germans. |
Turn 4
The 23rd Field Artillery Regiment switches its bombardment to the other side of the road, suppressing most of the German right flank on the railway line. The 12th Lancers fail but despite this the Glosts support units move with alacrity towards the sound of gunfire. The rest of the Glosters await the arrival of their new commander...
The 15th/19th Hussars initiative fire on the Germans but then fail their command roll. However the CO more than steps up to the mark, with the 7th RTR Matildas making a wonderful display of fire-and-manouevre, leading to the loss of the German Pak36. Flushed with success he tries one command too many and you guessed it, blunders and retreats away from the action. What are the chances...?
With the loss of the Pak36, the German left flank feels very exposed to the rather well armoured Matildas. A mass of German fire from the IG, mortar and ATR only results in the supression of one RR AC and the loss of paint on the Matildas.
 |
| The battlefield at the end of the trun. |
 |
| The Matildas dominate their part of the battlefield. |
 |
| The Glosters move to join the fray. |
 |
| The results of the 23rd FAR are plain to see, with the 15th/19th Hussars engaged in a firefight with the dug-in German infantry. |
Turn 5
The FAO fails to get through to his Field Artillery, only for the CO later on to get in touch and restablish contact with his Battery of 18pdrs, which results in the suppression of 3 German infantry units.
The new Glosters HQ arrives and briskly moves his troops towards the hill, but sadly the Glosters support units fail at a crucial time.Once again the 15th/19th Hussars initiative fire but then fail their command roll. A real let off for the Germans this turn.
The German try and make the most of their reprieve, which sees them destroying to RR ACs with IG and ATR fire.
 |
| The battlefield at the end of the turn. |
 |
| The Glosters desperate to join the party. |
Turn 6
With time running out for the British, the FAO and then both Glosters units fail their command rolls.The 15th/19th Hussars and the 7thRTR fire on the Germans but does little real damage. The lack of infantry support is really starting to show.
The Germans have little to shoot with at the British armour, but do succeed in finishing off the final RR AC.
 |
| Not much change at the end of the turn. |
Turn 7
The 12th Lancers restablish communication and the FAO gets through to his 18pdrs, who cause more hits and suppression on the pressured German left flank. The Glosters move forward but too slowly, still not able to really contribute to the battle.
The 15th/19th Hussars and 7th RTR show the 'Poor Bloody Infantry' how it's done and with concnetrated fire finish of the last of the German ATR units. This takes the Germans close to their break point and with the ability to damage the British armour, wisely choose to sit tight and wait it out.
 |
| The battlefield at the end of the turn. |
 |
| Both sides take losses as the fight for Bad Muhn-Reisen continues. |
 |
| The all but impregnable Matilda Is dominate the German left flank, but cannot advance into the village without infantry support. |
Turn 8
With the final turn the British desperately need to inflict casualties on the Germans to push them over their breakpoint, as it is highly unlikely that the Glosters will arrive to help take Bad Muhn-Reisen.
Unfortunately despite the FAO calling his artillery in once again and the best efforts of the 15th/19th Hussars and the 7th RTR, they fail to cause any more casualties on the Germans. Safely dug-in the Germans keep their heads down to retain control of the village.
 |
| The end of the battle. |
 |
| Too little too late as the Glosters support units finally arrive to add their weight to the battle. |
 |
| The main body of the Glosters still playing catch up. |
 |
| The 7th RTR still awaiting the support of the Glosters. |
Aftermath
So the Germans were able to hang on to the last, despite the best efforts on the 15th/19th Hussars and the 7th RTR. When victory points were totted up, it was a draw, which seemed a fair result looking back on the game.
Conclusions
So once again another very enjoyable solo game of Blitzkreig Commander II. So waht went right and what went wrong for either side?
So once again another very enjoyable solo game of Blitzkreig Commander II. So waht went right and what went wrong for either side?
- In the end the lack of infantry support put pay to any realistic hopes of the British being able to take Bad Muhn-Reisen. A combination of command blunders and lack of speed being on foot meant they couldn't really contribute to the battle. One option would be to mount them in trucks, but this doesn't seem right to me given the historical way the British moved their troops at this stage of the war.
- The Blunders, unusually all the same, slowed the British down a lot, especially the main body of the Glosters early on in the game.
- Deciding to have the Germans dug-in meant they were able to survive an awful lot of fire that was directed their way. If they had just been in the BUA, they would have reached their break point about half way through the game. This is something to remember for future games.
- The use of artillery and air support really helped the British in the first 4 Turns of the game, then later on as well when the FAO got his act together. But then this game is about combined arms operations!
- The lack of German AT guns meant they were pretty powerless against the British armour, especially the Matilda Is. But then this is what might have happened as most of the German assets had been deployed to Poland, including their artillery and AT guns. Nevertheless they did manage to weather the storm due to their troops being well deployed and dug-in.
Hi Steve,
ReplyDeleteGlad you finally managed to get a game in. As ever lovely looking table and a really decent mix of fact and fiction makes this a great AAR. I think your right in your conclusion to discount truck mounted infantry for the Brits, it wouldn't have felt right.
Cheers,
Craig
Tiny Terrain Models
WWW.wargames.blog.co.uk
This is great Steve. Particularly because you have provided a full battle report and I'm off on holiday tomorrow - I'll take my laptop and this will make a good holiday read.
ReplyDeleteJust one word of caution. How long before you run out of disgraceful puns?
Cheers, Keith.
Very nice looking game !!!
ReplyDelete