Sunday, 8 February 2015

Dux Bellorum Campaign Game 2 - The Battle on the Via Julian

The following is an account of the second battle in my solo Dux Bellorum campaign game.  
The Keynsham Chronicle
Many brave warriors fell at Bassa's Ford, their shields splintered, their armour rent and their ash shafts broken. Our Noble Tiern Cynwyl Cadarn vowed to avenge them and stood firm on the Via Julian, steadfast in his resolve to halt the pagan Hrothgar and send him and his men to back the whence they came or to hell, whichever they would prefer...
 
OOB
Welsh
1 x Companions
1 x Nobles Warriors
2 x Ordinary (foot) Warriors
1 x Ordinary (mounted) Warriors
2 x Bow Skirmishers
1 x Monks

Saxons
1 x Companions
4 x Noble Warriors
2 x Ordinary Warriors
1 x Bow Skirmishers
1 x Javelin Skirmishers
1 x Wardogs

Scenario 11 - The Roman Road
Agressor
Agressor 33 pts plus one free Strategy & Tactics up to 3 pts.
Agressor deploys on the road up to the half way point. The objective is to get as many units off the opposite board edge as possible. One unit of skirmishers may deploy off the road up to the half way point.

Repellor
Repellor 21 pts plus one free Strategy & Tactics up to 3 pts.
Repellor deploys up to 6" in from his board edge. One unit may be deployed in ambush in either the village or behind the ford.

Deployment

The Saxons advance down the road towards the Welsh warband deployed blocking the road.
With so few troops, the Welsh deployed with skirmishers on both flanks, with the Companions in reserve. The Monks would add much need spiritual resolve and leadership points where required.
The Saxons had their skirmishers in front with the wardogs on the left flank.
"Away Shep!" Jan Nokes and his dogs ready for battle.
The Welsh placed a mounted unit of Ordinary Warriors in an ambush position behind the ford.


Turn 1 Saxons - 6 LP Welsh - 8 LP
The Saxons got off to what seemed to be a bad start as their wardogs blundered, but the Gods were obviously with them as they retreated back towards their table edge, to be in a perfect position to possibly counter the Welsh ambush unit. The rest of the Saxons advanced as best they could, determined to brush aside the Welsh roadblock.

The Welsh for their part moved forward to engage the Saxons as quickly as possible, except the Companions who failed their roll, leaving their line badly fragmented. 

Both sides advance as quickly as they can.
'Shep' doesn't want to play ball, but the Welsh riders are out of charge range so advance into the long grass instead.


Turn 2 Saxons - 6LP Welsh 8 - LP
The Saxon skirmishers deployed to the flanks and Shep and Co decided to come back and play ball with the others. The Saxons in the centre deployed into a battle line with a small reserve kept to the rear.

On the Saxon left flank the Welsh cavalry rolled a Double 1 and so moved to attack the Saxon skirmishers, only to be charged by Saxon warriors in turn who were also charged by Welsh warriors. This proved to be a costly mistake as although the Saxon skirmishers were destroyed, so were the Welsh riders. However the Saxons took 3 hitys and were pushed back by the Welsh who followed up.

On the Saxon right flank the Welsh charged the Saxon skirmishers who had advanced too far and were destroyed, but at least they caused 1 hit on the Welsh unit. However the road was open to a determined advance by the Saxons...

Battle is joined on both flanks.
Both sides clash on the flanks...
... with losses on both sides. The Saxon left flank doesn't have much to stop its advance, talk less of the centre.


Turn 3 Saxons - 4LP Welsh - 8LP
With both warbands so close to each other, their were lots of uncontrolled charges with some advances by skirmishers from both sides.

Battle is fully joined, although the Saxons still have a good reserve force in the centre.
Despite being outnumbered, the Welsh bravely attack...
... seeing the Saxon left flank unit destroyed and pushing back the Saxon right flank.. However the Saxon reserve is yet to be commited.


Turn 4 Saxons - 3LP Welsh - 7LP
With the Saxons now on only 3LPs, would this hamper their attacks or their ability to soak up hits? The Welsh archers manage to score a hit on the Saxon Companions, causing them to use their sole LP to soak up the hit. With both sides engaged in combat, there was some movement as other units joined the fray.

'Shep' and the Saxon reserve join the battle on their left flank.
'Shep' sees off the Welsh skirmishers and the Welsh warriors on the Saxon left flank are pushed back. In the centre the Welsh manage to push back the Saxons, whilst on the right flank the Welsh destroy a unit of Saxons and nearly a unit of Nobles.


Turn 5 Saxons - 3LP Welsh - 5LP
Only 'Shep' is able to move as all other combats stay locked. A potentially crucial turn as the Welsh are close to their breakpoint.

No finesse in trying to move round the road block, the Saxons are simply happy to try and smash their way through.
The Saxon left flank is open as they finish off a unit of Welsh warriors, putting the Welsh on a break test. The Welsh Companions in turn destroy a Saxon unit, but the Saxons are still some way off their breaktest.
With the breakpoint reached, the Monks promptly fail their Bravery roll and flee the table, putting the Welsh at 75% losses and therefore automatically breaking. Given the Welsh had so few units left on the table and would be unable to prevent the Saxons leaving the table, the Welsh would have conceded the game anyway.

Conclusions
Well to be honest I was suprised that the Welsh managed to hold out for as long as they did, given they were so outnumbered.So as always a few post game thoughts:
  • Using the 'Hail Caesar' blunder table  is fun and adds more uncertainty to the game.
  • Monks are very useful for the Repellor with their 2 LPs as they have to move very little and so their low Bravery roll isn't really an issue.
  • Wardogs are fun but due to the blunder I didn't get to use them as much as I'd hoped. However as with my 'Sheep', 'Shep' & Co are great fun to have on the table.
  • Moving the Welsh riders too soon into battle cost them in the first turn of combat. I didn't think that they would be counter charged by the Saxons warriors. I know next time to be more careful before commiting them to combat.
  • The game could have had a very different outcome if the Welsh had managed to finish off the Saxon Nobles on the Saxon right flank. This would have allowed them to turn into the centre and potentially roll up the whole Saxon line.
Next Game 
Depsite the Welsh losses, I decided that the Saxons won a close run victory, so in the next game which will be 'Cattle Raid', the Welsh will have 30LPs and the Saxons 34LPs. Due to the nature of the scenario, the Welsh cavalry might come in useful to head off the Saxons and the cattle they are trying to steal. I've plenty of time to ponder things before the next game though.

Friday, 6 February 2015

Dux Bellorum trial games

This year has got off to a great start on the gaming front. Dave Fielder whom I 'know' via various forums happens to be working locally for a few months and so was looking for any gamers in the area that might be able to put on a 'show' during the week. Fortunately for me SWMBO did not object so we have been meeting up over the past few weeks for some trial Dux Bellorum games. 

Dave is a top chap and great opponent but has been hampered somewhat but his rulebook still being 'in the post'. After a few games we decided to run a mini-campaign whilst he's around to add a bit of fun and narrative to the games. Our first game was to have been this week, but said book had still not arrived so we had a dry run game just to get Dave more au fait with the rules. Dave kindly sent me some pics he took of the game as I forgot to get the camera out and ready in advance.

We played a straight Annals game with 32 points per side plus 5 point for Strategies & Tactics. Dave chose Stampede, which happens to be one of my favourites, whilst I took Monks and Experienced Warlord, the latter of which I completely forgot to use. Hopefully the photos and captions will give a flavour of the game. All figures are Pendraken, with the Irish from the Ancient Britons range and the Welsh from the Late-Roman.

The Irish look towards the hill that really is the objective of the game. Control this and you have a good chance of winning.
To the right the Welsh await their deployment.
The Irish in all their glory and with captured Welsh sheep to boot.

Another view of the Irish.


The Welsh with Monks for much needed divine support.
The cross is painted gold but it doesnt really show up on the table or in photos:(.
The Irish send the sheep stampedeing towards the Welsh lines.


Agnos Deus. The sheep and their stampede rules are great in the game. It was with great pleasure that we both managed to get the sheep and the cross to the hill at the same time.

The Welsh Nobles cannot resist the lure of the sheep in front of them...
... their lust sees them lose two points of cohesion...
... it is the end for the sheep.


At a critical point the Irish Companions blunder. We decided to use the Hail Caeser! blunder table to add another level to the game...


... which works out well for the Irish as they charge into the Welsh flank. Not their intended target but not bad.


Battle is joined on the hill, with the Welsh managing to get there first, thereby gaining an advantage with the Irish having to attack uphill for the most part.
The Welsh warriors manage to hang on against the Irish chariot attack and have support as another unit charges downhill to their rescue.
The Irish attack suffers badly as they lose four units in one turn. With only two leadership points left and little prospect of a win, we called it a day.


As always it was a fun game, with the Welsh gaining the hill being the turning point. This was due to my rolling a couple of double 1's in two turns, which moved my units far enough forward to deny the hill to the Irish chariots. Units on hills are damned hard to beat, unless you can turn a flank. Any hope of Irish victory went in one turn as they lost four units, effectively taking them out of the game. The highlight for me was the sheep stampeding towards the Monks and their cross, which had a certain biblical feel to it.
 
Hopefully Dave's book will have turned up in time for the next game, so that he can have a chance to really read the rules and check out any nuances as well as have a good think about his warband. Fingers crossed our campaign will kick-off in earnest next week.

Saturday, 24 January 2015

KR-16 Campaign Game 4

With honours fairly even after the two previous campaign games, the action moved on to a mission to gain or destroy some important scientific data contained in one of the vehicles.

Scenario Details
A scientific convoy has broken down and RDF and JI troops are en-route.
The convoy is in the middle of the table with RDF and JI forces coming on at opposite sides.
The convoy is in the process of repairing the damage.

Each turn after the 2nd, roll a D6:

3rd turn 6 = convoy is ready
4th turn 5 and 6 = convoy is ready
5th turn 4, 5 and 6 = convoy is ready
Etc…

The JI want to get whatever research is in there and sell it to get funds for their war effort.
The RDF want to get the scientists to Mariposa and safety.

JI Minor Victory
Destroy or disable all the convoy vehicles. (6 vehicles, civilian damage chart)
(Blow to the RDF and the so called ‘defence’ force.)

JI Major Victory
Steal the research data and make off their table edge with it.
(Sell to the highest bidder, BPI maybe?)
Takes 1 complete turn to search the lab to get the data.

RDF Minor Victory
Keep at least 50% of the civvies alive.
(Just doing their job.)

RDF Major Victory
Escort the lab off the table with data intact.
(Doing their job and advancing science.)


The convoy will obey any command if an infantry figure is placed in base to base contact with a vehicle.
That infantry figure is controlling that vehicle.
(Otherwise the vehicles only move on a 3+ toward the side edge)

So the RDF could put a figure in each vehicle and the vehicles will automatically move each turn.

Turn 1 - Junker Initiative
Despite the Junkers winning initiative, the RDF made the first real moves as both Pathfinder Rangers moved towards the stricken convoy. However only 1 squad of troops managed to deploy. The Junkers appeared to be put off by this show of force, only managing to really move a GMG Bullfrog into position, although it did managed to destroy one vehicle.

Turn 2 - Junker Initiative
The Junkers this time made good use of going first, managing to destroy a further two vehicles plus deploying their squads of infantry into great psotions ready for the next turn. Things were getting tough for the RDF with so many vehicles already destroyed. To try and rescue the situation they layed down smoke to try and block line-of-sight for the Junkers.

Turn 3 - RDF Initiative
Just when they needed to go first, the RDf failed! The Junkers lost no opportunity in seizing the advantage, with a rocket armed squad advancing forward and destroying the main objective vehicle. With no chance of gaining even a minor victory, the RDF withdrew, living up to their sobriquet of 'Run, Don't Fight'.

Post Game Thoughts
For once the Junkers shooting really was very effective as every round of shooting saw a vehicle destroyed. Things would have been very different if the RDF had just managed to get some activations in earlier to lay down smoke and close with the vehicles. Being unable to gave the upper hand to the Junkers, with devastating results. In campaign turns the RDF is looking rather ineffective against the Junker Insurgency.

We both agreed that not having RDF MS1 Pathmaster with its ability to allow the RDF to re-roll one failed activation per turn really hurt the RDF. Despite its points cost it really is a crucial piece of kit for the RDF. I expect that I will be seing it a lot more in future games...


Off Air - KR-16 Campaign Game 3

After the last game at Anshan, we decided that a nice little scenario would be based around Steve Chang and his radio station. Mr Chang having been less than complimentary about the Junker Insurgents recently, needed a visit to remind him to keep his thoughts to himself. That was the Junkers point of view. The RDF naturally were rather happy with his broadcasts and wanted to keep him on air. So the scene was set for a little showdown chez Chang.

Scenario details

Junker Major victory - enter the shack and spend one turn there having a quiet talk with Mr Chang.
Junker Minor victory - to destroy the radio aerial.

RDF Minor victory - Take out 50% of the Junker Insurgents.
RDF Major Victory - Prevent the radio aerial and Steve Chang from being harmed or damaged.

The forces involved were made up from units that had not taken part in the previous game. This made it rather interesting as both sides had to cobble together units for the action. The Junker had a Rocket Bullfrog and GMG Bullfrog with a full squad with sniper and an understrentgh squad with no special weapons. The RDF had a Pathfinder Ranger and a squad, the latter deployed in cover at the radio station.

Turn 1 - RDF Initiative
The RDF got off to a bad start as they failed to activate their Pathfinder Ranger. The troops dug-in went onto react fire as there were no targets in range. The Junkers managed to activate both vehicles, hitting the aerial but only scratching the paintwork.

Turn 2 - Junker Initiative
It was the Junkers turn to have some bad luck as both vehicles failed to activate, leaving them at the mercy of the Pathfinder Ranger, which succeeded in immobilising the Rocket Bullfrog. The Junkers task just got that much harder...

Turn 3 - Junkers Initiative
Despite gaining the initiative, the remaining Bullfrog failed to hit the aerial, only for it to be blown up by fire from the Pathfinder Ranger. Any chance of gaining a victory had disappeared so the accompanying infantry melted away, leaving the RDF with a Major Victory.

Post Game Thoughts
Once again a game that could have gone either way early on. If the Pathfinder had managed to lay smoke in Turn 1, the Junkers would have had to move to try and get line-of-sight to the aerial, rather than sitting back and hoping to get a lucky hit on the aerial. They are very vulnerable to the RDF AFVs, so try to keep in cover for as long as possible. 

As the scenario was over so quickly, we replayed it several times, with the Junkers managing to destroy the aerial with their very first shot! Why they couldn't do that in the game!!! As we are running a narrative campaign, frankly it didn't matter as we had fun as always, which is what it should be about at the end of the day.

Friday, 9 January 2015

The Battle of Bassa's Ford - Dux Bellorum Campaign Game 1

To kick off 2015 I decided to try running a solo Dux Bellorum campaign. Sadly the rulebook doesn't contain any rules for a campaign. However in 2014 I bought the Warhammer Historical 'The Age of Arthur' supplement, which is an excellent resource for the period, but also contains two different campaigns. The scenarios in the supplement dovetail nicely with the ones in Dux Bellorum, so only a few tweaks appear to be required.

Fortunately I already had two painted warbands so could kick things off straight away. Re-inforcements are in the lead pile in the attic to give more flexibility, but at my disposal were the following:

Welsh
1 x Companion Foot Warriors
2 x Foot Nobles
6 x Ordinary Foot Warriors 
2 x Foot Skirmishers (javelins)
1 x Foot Skirmishers (bow)
1 x Stampede 
1 x Priest

Saxon Sea Raiders
1 x Companion Foot Warriors
4 x Foot Noble Warriors
2 x Ordinary Foot Warriors
2 x Foot Skirmishers (javelin)
1 x Foot Skirmish (bow)
1 x Shaman
1 x Beserkers

Of the two campaigns, I chose 'Campaign 2, The Raiding Season' as I liked the narrative feel of it. Also, the next scenario depended very much upon the outcome of the previous game. The scenario was modified slightly, details of which can be found below:

Scenario 3 - The Battle at Bassa's Ford
  • Use 'River Battle' on p58 of the Dux Bellorum rulebook for set up details.
  • The Repeller deploys as normal.
  • The Agressor deploys all of his skirmishers in his deployment zone. Other units start off table and arrive upon a successful 'Bravery' roll.
  • Champions Challenge. The Agressor issues a challenge to try and buy time for the rest of his warband to arrive on the table. Use the 'Champion's Challenge' from p50 of the Dux Bellorum rulebook. Neither side pays any points for this 'Strategy & Tactic'. If the Agressor wins the challenge, he also gets one free turn in which to try and activate his warband to arrive on the table. The Repellor doesn't get to activate in this free turn.
So with the scenario sorted, it was time to sort out the respective warbands for the start of the campaign. I decided to have both warbands as 'Warriors', mainly to help speed up play and to fit in with my general view of them. After some thought, I went with the following:

Welsh Warband 32 points
1 x Companions - The Teulu of Tiern Cynwyl Cadarn
2 x Noble Warriors - The Cambrogi of Uchelwyr Culhwch & Uchelwyr Cadfael Cambrogi
4 x Ordinary Warriors
3 x Skirmishers
1 x +1 Leadership Point

As you can see, quite a few units to play with in the game, with plenty of skirmishers and the extra point of Leadership should give them more flexibility and staying power.

Saxon Sea Raiders Warband 32 points
1 x Companions - The Hearthguard of the Atheling Hrothgar
3 x Noble Warriors - Thegns Hrethric, Hrothmund, Hrothwulf and their Duguth
2 x Ordinary Warriors
1 x Skirmisher (bow)
1 x Javelins for 6 units

In contrast, the Saxons are a small, hardcore unit that hope to punch a hole in the massed ranks of the Welsh. The 'S&T' javelins option should give them some hitting power at distance before they close for combat. I've never used this before but it could be quite useful...

The Keynsham Chronicle
In the year of our Lord, AD555, the Saxon raiders appeared out of the East. The Atheling Hrothgar laid waste to many villages, bringing death and misery to the innocent. Our blessed Protector Coinmail, sent the noble Tiern Cynwyl Cadarn to bring down the wrath of God upon the pagan Hrothgar. They met at the place known as Bassa' Ford ...


Deployment
The Welsh deployed in the left, with the Saxon skirmishers the only unit on the table.

The ford is situated in the centre of the table with a few trees to mark its place.
The Welsh host of Cynwyl Cadarn deploy for battle.
The lone Saxon skirmishers hoping that the rest of Hrothgars warband will soon join the party.


Turn 1 - Welsh 7 LP Saxons 6 LP
The Saxons as a whole raced towards the ford, matched by the Welsh. The only blot on the turn for the Welsh was the bow armed skirmisher unit blundering, thereby losing 1 point of cohesion.

All roads lead to the ford...


Turn 2 - Welsh 7 LP Saxons 6 LP
The Saxon skirmishers were the first to the ford, bravely occupying it. Their Welsh counterparts decided not to wait for the main body of the warband and charged into close combat. The Saxons wisely used their LPs to soak up any hits sustained and remained locked in combat.

Both sides close in on the ford.
The Saxons defiantly hold on despite being outnumbered.
   
Turn 3 - Welsh 7 LP Saxons 6 LP
There was some shooting from both sides but to no effect. The Saxons continue to advance as quickly as they can, whilst the Welsh deply about the village and ford, readying their lines for battle. The Saxon skirmishers best their opponents in the ford, destroying one Welsh skirmisher unit.

The Saxons in nominal control of the ford at this point.


Turn 4 - Welsh 6 LP Saxons 6 LP
In the shooting phase the Saxon archers cause 1 point of cohesion to be lost by the Welsh skirmishers, who move out of the way of the main Welsh units. A unit of Welsh Nobles charge the Saxons in the ford and unsuprisingly make short order of them.

Both sides are very close to each other now.
The Welsh now in control of the crossing.


Turn 5 - Welsh 6 LP Saxons 5 LP
Once again the little shooting that there was was rather ineffective. The Saxon Nobles made a supported uncontrolled charge on the Welsh, only to be repulsed due to some wide use of LPs to soak up hits.


The Welsh firmly in control of the ford, for now...
The Welsh Nobles make a follow up move to try and bring more units over the ford.


Turn 6 - Welsh 6 LP Saxons 5 LP
The Saxons moved more units into support of the main combat as well as trying to manouevre out of bow range. This time the Saxons bested the Welsh in close combat, pushing them back but electing not to follow up. The Welsh unit of Nobles was now one point away from breaking. This would allow them to used their javelins before moving into combat next turn.


The Saxons close in to bring as much support to bear as they can.


Turn 7 - Welsh 6 LP Saxons 5 LP
The shooting was more effective this time, with the javelins causing the Welsh Nobles to use precious LPs to avoid breaking. At least the Welsh caused some losses of cohesion on a Saxon unit. The Saxons managed to break the unit of Welsh Nobles, the javelins having taken their toll.


The Saxons push back onto and nearly over the ford.
The Saxons receiving as much support on the flanks as they can. However the right flank is coming under sustained missile fire...


Turn 8 - Welsh 5 LP Saxons 5 LP
A quiet turn as any hits were soaked up and the combat at the ford drawn.


Stalemate.


Turn 9 - Welsh 5 LP Saxons 5 LP
The shooting was ineffective once more. With the combat at the ford in danger of bogging down, both sides were only allowed to use the LPs for attacks and not to soak up any hits. As a result both the Saxon and Welsh units died a heroic death! With neither side the winner, there was no opportunity to follow up and move into the ford.


The ford once again clear of combat, but not for long.


Turn 10 - Welsh 4 LP Saxons 4 LP
In the shooting phase more hits were taken by the Saxon right flank and at the ford, the Saxons had managed to advance over and move units across onto the left flank.


The Saxons have pushed across, with the Welsh ready to counter attack.
Both sides are losing points of cohesion, threatening their ability to continue the fight.


Turn 11 - Welsh 4 LP Saxons 4 LP
The shooting phase turned up trumps, with a unit of Welsh skirmishers finally succumbing to javelins, but the Welsh archers reduced a unit of Saxon warriors to 1 point away from breaking. At the ford, the combat ebbed and lowed, with neither side in the ascendance.


It's all starting to get very messy...
The Saxons possibly have a slight upper hand, but only slight.


Turn 12 - Welsh 3 LP Saxons 4 LP
Once again the shooting phase caused more hits, but it was the close combat phase that clinched the battle. The Welsh Nobles finished off the Saxon unit that had suffered 4 points of cohesion loss from missile shooting, but in return the Welsh lost two units of warriors. This put them at 50% losses and so triggered an aoutomatic break test, which they promptly failed, leaving the Saxons in command of the ford.
 

The Saxons are over the ford...
... with the Welsh having too few units to stop them.


Post Game Thoughts
Well it's been some time since I played Dux Bellorum, but it all came back to me fairly quickly and was once again another enjoyable game. Nice and easy to set up and relatively quick to play with plenty of decisions to be made through out the game on how to use those precious leadership points. So as always a few thoughts:
  • At the start of the game I completely forgot about the Champion's Challenge!!! Mea culpa.
  • I think the River Crossing scenario is a hard one to play. Without cavalry it can descend into a slugging match. This game was in danger of that but having seen this before, I made the decision at a crucial point not to use any LPs to soak up hits. It freed up the game and allowed it to flow once more, plus gave the cinematic element of both sides fighting to the death in a heroic fashion.
  • Playing this as part of a campaign is much more fun as far as I'm concerned. Being able to use the 'Age of Arthur' supplement is a big help. Maybe one day Dan Mersey will come up with some ideas for a simple campaign system for Dux Bellorum.
  • I'm not quite sure how to reward the victor, but my initial thoughts are to give them 1 extra point for each victory. Nothing too dramatic but enough to maybe give them that extra edge in the next game.
I think before the next game I need to finish off some cavalry for the Welsh to give them some options as well as another skirmish unit for the Saxons. Next game may see the arrival of the 'killer sheep' or the Saxon beserkers...
 
Next scenario
This will be Scenario 11, 'The Roman Road'. In essence the Saxons have to get off the board past a Welsh delaying force. The Saxons will have a manpower advantage but will face a time limit. Details to follow once I've sorted them out.

Red vs Blue Wargaming


Time, or more specifically lack of, is always my enemy when it comes to painting new armies etc. Then of course there is always the issue of shiny new toys or rules coming along to distract the weak willed and feeble minded gamer like myself. Over the years I've tried to come up with ways to overcome this problem, but to no avail. I tried 2mm armies that gave the feel of large battles but they just didn't grab me, plus there was the issue of yet another set of terrain and scenery to try and store.


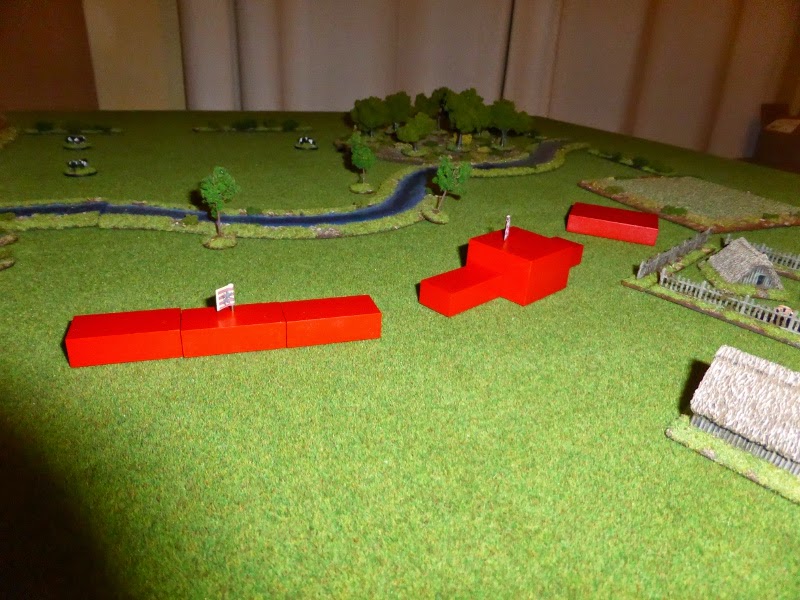
Whilst at work one day I remembered a picture in a wargames magazine of a game at a show/convention, where the game was played on a normal table with standard scenery etc, but instead if figures, the units were represented by painted blocks of red and blue for each side. The game had a nice visual appeal but looked like something you might encounter at a staff college. The more I thought about it the more the idea appealed to me.

The blocks could be easily made at work and painted there and could represent any units from any time period. One minute they could be Greeks vs Romans or Prussians vs Austrians in 1866, the next Parliamentarians vs Royalists at Naseby. Just change the flags/standards and unit names etc to suite the relevant battle.

So in some spare moments at work I quickly knocked up a few sample blocks to see how they looked. As I mainly game in 10mm, I decided to use my standard base sizes of 40mm x 20mm. Add in base thickness and figure height and I decided upon a unit height of 1/2" or 12.70mm and for pike blocks I increased this to 1"/25.40mm. The main reason was that these are readily available thicknesses for mdf or acrylic, making my job that much easier. The results can be seen below.

A block of pike with two wings of shotte, supported by commaned shotte on the left and an artillery battery to the right, command the ford of a local river.
Another view that gives a better idea of the size of the blocks.
The field boundaries make the table 3'x3'.
The same blocks but now arranged as a unit of infantry with a unit of cavalry on the left wing.

I'm happy with the way they've come out so far. To be honest I'm not sure about the flags. I'm going to increase the size of them to give them more visual impact, but these were ones that I happened to have at hand. Unit commanders are most likely to be round in shape to make them stand out on the wargames table, but I've yet to actually make any samples. Another thought is to add in some more colours for units, to make allied units etc stand out from the main protaganists. For the present I will be sticking with blue and red. So all that remains is for me to work out a cutting list to give me enough basic units for a variety of games. Once this is done, with a bit of luck I might be able to have everything finished by the end of the month.So far I've made about sixty 40mm x 20mm blocks, so am well on the way...