Friday, 8 March 2013

CSI Russia

Background
A few weeks ago I decided it was high time that my Italians forces had a run out. I fancied something a bit different so after perusing the BKCII rulebook I thought I'd go for a scenario based around the Italian involvement in Operation Barbarossa 1941. Fortunately for me I hadn't long ago finished my 5th Peoples Flying Column for use in the AVBCW, and being a Socialist force these were painted Soviet uniform colours. So Hey Presto! I had an opponent for the Italians.

Some background research into the early Italian involvement came up with the Corpo di Spedizione Italiano in Russia. After some reading of this and other articles, I decided to choose the 3rd Cavalry Division Amedeo Duca d'Aosta as the basis for my battlegroup. This would broadly consist of two Battalions of the 3rd Bersaglieri Regiment, supported by a squadron of the San Giorgio Armoured Battalion. It would seem that the Italian airforce was not involved that much at the start of the campaign so I went with some German support in the form of Stukas.

The Russian forces would be an adhoc force of mainly infantry supported by some armoured elements; in short an excuse to use most of my 5th PFC units. However being cut off they  would be devoid of artillery support.

During Operation Barbarossa the Russians were constantly being cut off by the advancing German Panzer forces, with the following infantry left with the task of mopping up the remaining pockets of resistance. Having read plenty of such examples in the superb "War Without Garlands" by Robert Kershaw, I decided to use one of these as the basis of the scenario for the game.

Scenario Details
I based the game upon Scenario 2:Assault with the following 'house rules' to suit the above:
  • The Russians began the game dug-in in hastily constructed foxholes. This meant that they were hit on 5+ but had no save. This was to try and simulate the hastily constructed nature of there defensive line.
  • Hits stay on. I have tried this in a game before and liked it as it speeded up play. 
  • Auto-suppression for hits suffered from artillery, air, mortar and infantry gun fire. The latter two I hadn't tried before but wanted to give it a go.
  • The Russian units counted as Stubborn, meaning that they deducted one die when rolling for fall-back from supression. This was based upon accounts in the Kershaw book where the Russians fought to the bitter end in many cases.
  • The game was extended to 12 turns rather than 8 due to playing down the length of the table. There was no reason for this other than the table looked better layed out this way!
  • The objective for the Italians was to gain control of the bridge and for the Russians to simply deny them this crossing point.
So I had accrued plenty of TOIL over the week to have Friday off and as the kids were in school and SWMBO was at work, it seemed the perfect opportunity to get a nice leisurely solo game in. The table was set up and the forces quickly sorted out first thing and then it was onto deployment ready for the off!

Turn 1
The Russian forces deployed in a broad defensive arc around the bridge with a reserve on the other side. The Italians deployed oppossite them using mobile deployment and flank deployment.

The Italian recce unit on the left quickly spotted Russian troops in the orchard on the village outskirts. However the Italian battlegroup was less than keen to get to grips with the Russian foe, with only the CO managing to get any real movement from his units. 

The Russians were not unduly alarmed at the arrival of so few enemy units and moved up some armour in response to get better fields of fire.


An over view of the battlefield and the Russian deployment.

Russian troops hastily dug-in in the orchard.

The Russian reserve units guarding the bridge.

AT gun, infantry and armour covering the centre and left flank.

The Italian deployment.

Turn 2
The Italian advance continued to be somewhat patchy and as a result the Russians were content to sit and watch.
 
Overview at the start of Turn 2.
The Italians not living up to being a cavalry division.

Turn 3
Almost a repeat of Turn 2, but with the Italians getting more units onto the table and opening fire on the Russians courtesy of their recce units spotting the dug-in enemy. The Russians once again kept their powder dry.

The IG suppressed as the result of opportunity fire.
 
The mortar unit that suppressed the IG unit.
Finally the Italians start to move.

Turn 4
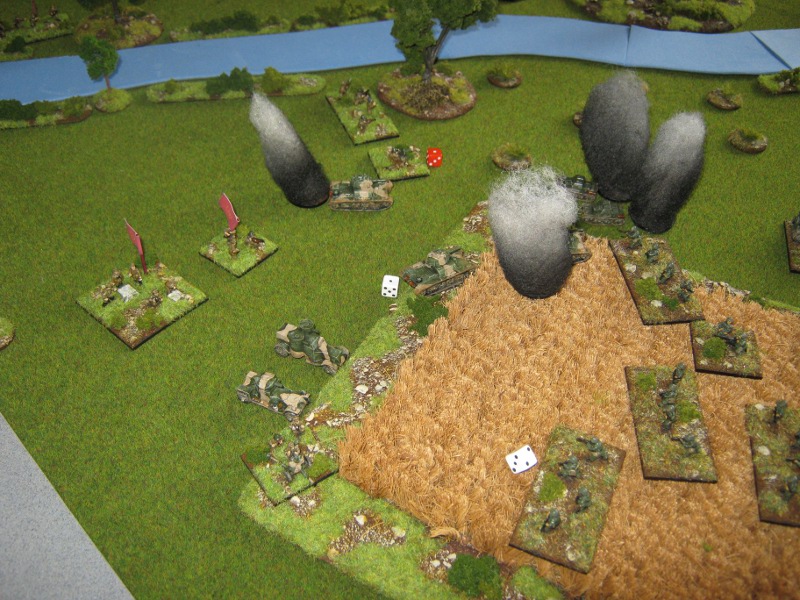
Things start to hot up as the FAC successfully calls in a Stuka strike, which survives the ack-ack fire but loses 50% of its attacks. As a result it decides to concentrate all of its attacks on one T-26 tank, supressing it. The infantry continue to advance, with the centre advancing to the edge of the cornfield. AT gun fire knocks out a T-26 which opens up the way for the L3/35 tankettes to advance.

With the sudden advance of the Italians in the centre, the Russians need to respond, and quickly.  Combined fire sees the demise of an infantry unit as well as the IG. The CO moves his armoured units over the bridge to the centre to help counter the Italian threat there.

Overview at the start of Turn 4.
Stuka support arrives.
The demise of the T-26.
The Russians respond.

The Italian advance in all its glory.

Turn 5
Once again the FAC manages to call in the Stuka, which again survives the ack-ack fire, causing an infantry and tank unit to be supressed. Attacks start to go in against the units in the village. Unfortunately the CO was the only command unit to be successful, moving the L3/35 tankettes to the conrfield.

The Russians got off to a bad start with the HQ in the village blundering, meaning that this turn and the next all HQs would be at -1 to their command roll. The CO although unaffected, was only able to move the T-25s towards the tankettes.

Overview at the start of Turn 5.
The Stukas attack goes in past the burning wreckage ot the T-26.
The Italians going nowhere fast.
The advance of the L3/35s.
The Russian armoured support advances to counter the tankettes.

Turn 6
The FAC manages to call in the Stuka again but only for the ack-ack fire to see it off this turn. The Russians lose an MG unit to IG fire in the village, whilst in the cornfield both sides echange fire to no effect.

Only the Russian CO manages anything this turn, with the tanks and armoured cars suppressing some infantry units and destroying a tankette.

Overview at the start of Turn 6.
The Italians slowly make headway.
Both sides exchange fire to no effect.
The Russian fire is more effective...
... supressing the infantry units with AT rifles.

Turn 7
The FAC is single handedly taken the fight to the Russians it seems, once again calling in the Stuka. Despite heavy ack-ack, it hits and supresses a T-26 tank, the major threat to the Italians in the centre. Attacks continue going in on the infantry in the orchard on the outskirts of the village. The Italian infantry are still painfully slow, which could cost them the battle at this rate.

The Russians have a better turn, with an Italian AT rifle unit destroyed and the other supressed, along with other units hit and supressed as well.

Overview at the start of Turn 7.
The Luftwaffe shows how it should be done (again!).
The Italians take lossess in the centre.

Turn 8
The FAC fails this turn, but the Italian units on the left flank step up to the mark and in a devastating display of combined arms, clear the village of all Russian infantry units. Typically they then fail to captitalise on this as all the other units fail their command rolls!

The Russian somewhat shaken by the sudden loss of their right flank, only manage to destroy another AT rifle unit. However this is leaving the Italians with precious little with which they can fight the Russian armour. The game hangs in the balance still.

Overview at the start of Turn 8.
The Italians somewhat strung out.
The village cleared of infantry.
The loss of the AT rifle units is keenly felt.


Turn 9
The Italians have a quiet turn, with the L3/35s finishing off an infantry unit and other fire causing some suppression, and the advance continuing to be patchy.

The Russians have little to fight back with and only manage to destroy on tankette, despite an awful lot of fire being directed at them. The armoured cars retreat to a safe distance from the Italain infantry.

An overview of Turn 9.
The infantry close in on the armoured cars, but fail to assault.
The Italians are still scattered across the battlefield.
Discretion is the better part of valour. The armoured cars make a tactical withdrawl.
A tankette finally succumbs.

Turn 10
The Stuka arrives again after a rest and true to form flies through the ack-ack to suppress an MG unit. A double 1 on the left flank sees the village completely clear of the enemy as the remaining ATG unit is destroyed. 2 blunders in a row see Italian units advance 1/2 a move towards the enemy (1 unit had the same blunder the previous turn!). The cntre fails again but the CO manages to get an order off to the ATG unti which destroys a T-26.

Things are looking pretty rum for the Russians, who start to make small tactical withdrawls where possible, as they are close to their break point.

Overview at the start of Turn 10.
The Stuka flies through the smke from the burning tanks to press home his attack.
The Russian centre under pressure.

Turn 11
With victory in sight, the Italians put in one last effort and manage to destroy an AT gun, mortar and MG unit. The Russians are now over their breakpoint and fail their command roll at the start of their Turn.


Overview at the start of Turn 11.
The severely weakened centre.
The Italians close in for the kill.
The village in Italian hands
The left flank all but gone.
The final view as the Russians collapse.

Aftermath
Well what I thought would be a quick game turned into one that almost went to the wire. The Russians so very nearly hung on but in the end the Italians were able to combine their fire to cause casualties when it mattered. Totting up the victory points at the end meant the the Italians had been able to gain a Major Victory.

As always it was great to be playing BKCII again, after what seems to have been quite a long time. The 'house rules' worked well I thought and I certainly will be using the newer ones again. So how did the game go overall? Well here are a few thoughts:
  • Keeping hits on certainly made the game flow more. If I had stuck with hits come off at the end of the turn, it would have turned into a slugfest which would not have been fun.
  • I liked the mortars and infantry guns causing suppression as per artillery. This feels right to me when you read how effective they were on the battlefield. A few more games are required to make sure it doesn't skew game balance too much.
  • Two low CV battlegroups can make for a stop-start game, which can get a bit frustrating at times, especially for the attacker. This is certainly true when playing down the length of the table. One suggestion that my good friend Keith Flint made, was to up the CVs of both sides by 1 to try and make the game flow a bit more. After all we want to have fun at the end of the day. Again a few more games with low CV battlegroups would need to be played re: game balance to make sure the feel of each battlegroup was maintained.
 
So hopefully it won't be too long before I can get another game in, maybe next time a return to the AVBCW milieu.

Sunday, 3 March 2013

ECW in 10mm

I first started playing ECW wargames way back in the mid '80s whilst at University and ever since then have had a soft spot for this period. This may be due to the fact that I grew up just outside of St Ives in Cambridgeshire where there is a rather nice sculpture of Oliver Cromwell in the marketplace.

Fast forward about 25 years or so and I revisited this era with the aim of using one of the many Warmaster Ancients variants as a ruleset. I wanted to capture the feel of the larger battles of the period, as well as the 30 Years War, and so chose to do this in 2mm from Irregular Miniatures. Now I know this is herecy to my good friend and regular gaming chum Keith, but we all have our crosses to bear.

An over all view of the Parliamentarian forces.

Infantry pike blocks supported by cavalry and artillery.

Painting rice; a close up of the pike blocks.
 

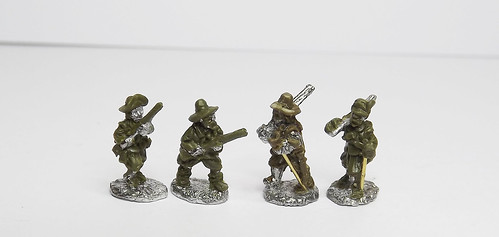
However many of the engagements of the period were very small scale affairs, not really suitable for 2mm in my eyes. I didn't want to go the 'standard' 28mm route so this project was parked for a number of years. Then late last year Pendraken announced that they were revamping their ECW range and so the project was back on the list of future projects. The first batch of figures have just been released and can be seen here along with their existing range. Future release include the dismounted dragoons seen below.
 

I think you will agree that these are really rather lovely figures and perfect for small scale engagements within the ECW period. These could also be used alongside the recently refurbished League of Augsburg range for events just after the ECW had ended. Purists may disagree however but I'm quite happy to mix and match a bit within reason.

So now it is just a case of finding a suitable ruleset to produce fun and challenging games for small unit actions for this period of English history, as well as the main obstacle of finding time to fit this in amongst my other myriad of gaming projects! 

Friday, 1 March 2013

Madfest 2012 'in' Wargames Illustrated

Wargames Illustrated has put up an article on their website of last years Madfest wargames show. It is written by Paul Davies, club member and also one of WI main photographers. As a result the there are, unsuprisingly, some very nice shots of the tables as well as some comment on the weekend and what went on. 

I know that planning is already well under way for this years event which I will definitely attend, as long as it doesn't clash with my 50th birthday!

Sunday, 3 February 2013

Bashing the Bishop!

With my wife away for the weekend with friends, I decided to invite my regular gaming chums, Craig, Keith and Chris, over for a multi-player Dux Bellorum game. For Keith this would be his first game and for the rest of us the chance to play against an opponent rather than playing solo.

As we are all still relatively new to the rules, this was to be a test game where we could really get to grips with the games mechanics, test out strategies and to get a handle on how different unit types and warbands worked. Craig chose to play Romano-British as he has a virtually finished warband that he naturally wanted to put on the table and show it off in all lts glory. Chris went for an Irish warband, whilst I chose to draw up two very different warbands for the Saxons and Welsh. So broadly speaking the forces were as follows:

Irish
1 x Foot Companions
3 x Noble Foot Warriors
1 x Ordinary Foot Warriors
4 x Javelin Skirmishers

Welsh
1 x Mounted Companions
2 x Noble Riders
5 x Ordinary Warriors
1 x Mounted Skirmishers

Saxons
1 x Foot companions
3 x Noble Warriors
4 x Ordinary Warriors
+1 leadership Points
Javelins

Romano-British (I'm not sure on this but I think it was roughly the following)
1 x Foot Companions
2 x Noble Shieldwall
1 x Ordinary Riders
1 x Foot Bow
1 x Foot Bow Skirmishers
1 x Monks
Javelins

So as you can see quite a mix of warband types which is what we wanted. With Craig and Chris already spoken for with their warbands, Keith opted for the all cavalry force of the Welsh, leaving me with my Saxon Warriors. In keeping with the early Dark Ages period, Craig and Keith paired up as the gallant defenders of Albion with Chris and I as the Pagan invaders.

Using the KISS principle for this learning game, with went with a straight forward Annals Battle as per the rulebook. Unsuprisingly the Pagans won the die roll off and became the Agressors, which again was entirely in keeping with the period.

Craig and Keith selected the terrain and duly placed it, then both sides deployed as per the rules. The Romano-British deployed in and next to the woods with the Welsh cavalry on their extreme left flank. The Irish deployed opposite the woods with the Saxons on their immediate right in front of both the Romano-British and Welsh.

Now I spent most of the time playing the game and taking photos, rather than taking notes. However the following pictures should give you an idea of how the game developed.

The Romano-British deployed in and next to the woods with the Welsh cavalry on their extreme left flank. The Irish deployed opposite the woods with the Saxons next to them in front of both the Romano-British and the Welsh.

The Romano-British Companions.

Not a Santa Claus convention but the Monks ready to give spiritual support.

The Welsh advance to try anf flank the Saxons, who move out to meet the threat. By the woods both sides move forward. Not the red cohesion die caused by blunders in the first turn!

The Welsh cavalry came off worse in a clash with the Saxon Warriors, losing one unit of Riders.

The Welsh Mounted Companions close to routing after the first clash.
The irish and Saxons itching for a scrap.

The Saxons close in on the remaining Welsh cavalry.

The Saxon elite get stuck in.

The Romano-British Companions see off the first Saxon assault on their shieldwall. This was to be the start of a protracted but important fight.

The Welsh cavalry attempt to get round the back of the Saxons, whilst the Irish and Saxons close in on the Romano-British.

The Saxons turn to meet the threa to their rear whilst combat rages by the wood.
The Welsh cavalry severely outnumbered.

The Irish join the fight.

The threat from the Welsh cavalry has all but disappeared.

The victorious Saxons.

The Shieldwall stands firm.

The Welsh cavalry routed after reaching 50% and then failing their Bravery rolls.
The Romano-British stand like a rock against the waves of Saxon and Irish attacks, but the irish are beginning to lose units.

The Irish Nobles Warriors are lured into a trap in the wood by the Monks and Foot Bow.

Even with the trap sprung in the wood, things are not looking rosey for the Romano-British.

With the Welsh cavalry gone, the saxons move to attack the Romano-British left flank.

A few losses cause the Irish to leg it off the table, most likely to go and watch the opening Six Nations game with the Welsh in the pub! Could the Romano-British pull off an unlikely win from here?

The Saxons close in for the kill. With cohesion points building up for the Romano-British, a few turns of combat see them at 50% and they too leg it off the table, most likely to join the others ready for the Calcutta Cup match!

Afterthoughts
Well we certainly had an entertaining game full of action and high drama, exactly what we wanted. I think we had at least 4 blunders in the game, two in the very first turn, as well as a fair few double ones. For a learning game it certainly ticked all the boxes and post-match reading of the rules through up a few things that we had missed, but then this was the point of the game.

We did however surpass ourselves on our usual bawdy badinage, with no opportunity for double entrendres missed. Any talk of 'interpenetration', being 'taken in the rear' was seized upon with juvenile glee. The highlight of this, if you can call it that, was the "Irish being sucked into the woods to bash the Bishop, only to be assaulted and taken in the rear". I fear Keith still hasn't recovered from his shamefull display of sniggered comments!

So what did we learn, apart from the fact that we should really grow up?
  • Cavalry on their own are very weak.
  • Skirmishers need to be used with care, to get them into the right place for maximum use but not expose them to danger.
  • Shieldwall units are tough nuts.
  • When and when not to group units will take some practise.
  • A 'combined arms' approach probably works best.
  • Uncontrolled Charges can be very usefull, especially against cavalry.
  • When and where to place Leadership Points, and then how to use them, is crucial.
I'm sure there are a few other points, but hopefully you get the main gist.  Once again Dux Bellorum produced a great, fun game that was very easy to play, which as I've said before, is what it's all about. In true Frankie Howerd style, I can't wait for another chance to get 'stuck in!'

Saturday, 19 January 2013

"Oi' Gerrof my land!" or the Battle for Hanham.

Having made some counters for a variety of warbands for Dux Bellorum, it was time to get a trial game in to see how the rules played. For the first game I wanted to keep things nice and simple, so used the sample warbands from the book as a guide, with no Strategy &Tactics options taken. 

Late Roman
1 x Mounted Companions (Cynwyl Cadarn)
1 x Noble Riders
1 x Ordinary Riders
4 x Ordinary Shieldwall
1 x Bow
1 x Mounted Skirmisher (Javelin)
2 x Foot Skirmisher (Bow)

Saxons
1 x Foot Companions (Hyngga the Angle)
1 x Noble Warriors
7 x Ordinary Warriors
1 x Foot Skirmisher (Bow)

Both warbands had 6 Leadership Points each. Being a solo game I decided that the Late Romans would use their LPs mainly for defence when in close combat, with the Saxons using theirs for offence. This seemed in keeping to me with the Late Romans being a Shieldwall warband and the Saxons a Warriors warband.

So with the Warbands sorted it was time to choose a scenario. Again keeping things nice and simple (the KISS principle works for me) I went for an Annals Battle. This way I could concentrate on the rules rather than the various nuances that a more involved scenario might entail. Unsuprisingly the Saxons won the die roll for Agressors, which is entirely in keeping with their image. So the poor Late Romans had the unenviable task of defending their land from the marauding Pagans.

Deployment
For a first game again I went for the simple approach and played the game on a 2' x 2' table. Scenery was kept minimal  as befitting the Late Roman Repellors with a wood and hedgeline in opposing table quarters.

Deployment was as per the rulebook with the Saxons forming three battle lines with Hyngga and his Nobles in the centre, flanked by Warriors on either side. The Late Romans formed as solid shieldwall in the centre with skirmisher in the woods on the left flank and Cycnwyl Cadarn and his cavalry on the right flank.

The warbands deployed for battle.


Turn1
Both sides used their LPs to aid movement as there was no chance of combat being joined at this early stage of the battle, with each warband advancing forward whilst maintaining a cohesive battle line. No one wants to leave a flank hanging in the air, even in the Dark Ages!

Both sides advance.

The skirmishers move to the edge of the wood to shoot at the Heathens.


Turn2
Again, each warband used it's LPs to ensure they passed their Bravery rolls. Both sides used their skirmishers with bows to shoot at their opponents, with neither side inflicting any hits. Both sides continued to advance in their respective battlelines as before.

Combat will soon be joined.


Turn3
With combat highly likely this Turn, the Late Romans used the LPs to remove hits taken by the Shieldwall Warrios and the Cavalry. The Saxons on the other hand allocated their LPs to aid their attacks, with the Warriors on the Left Flank and the Companions in the centre sharing them equally.

The Late Roman skirmishers got the better of the shooting phase, with the Mounted Skirmishers with Javelins inflicting 1 hit on a Warrior unit, whilst the Skirmishers in the wood caused 2 hits on the Saxon Skirmishers with bows. The Late Romans with Bow were not to be outdone and caused a hit on the Warriors directly in front of them. The Saxons failed to cause any hits in return, but were not too worried as shooting is not their forte. Up close and personal is more their style.

With the shooting out of the way, it was time for some combat. The Mounted Skirmishers with Javelin decided to withdraw out of charge range of the Saxon Warriors, whilst Cynwyl Cadarn and his cavalry charged home into the Saxon left flank. For the Saxons their bloodlust was up and they did not bother to attempt to stop their  uncontrolled charges, with the left flank attacking the Skirmishers in the wood and Hyngga and his Nobles charging into the Shieldwall.

The Saxon right flank easily saw off the Skirmishers with bow, but received a hit for their troubles. In the centre the Saxon Warriors combat with the Late Roman bow was a bit embarassing as they only inflicted 1 hit, causing the Foot Bow to retreat 1/2 a base width. Hynggas Companions attacks were seen off but the judicious use of the Late Roman LPs to save the hits cause, resulting in a drawn combat. The Noble Warriors faired better inflicting 1 hit on the Shieldwall forcing it back 1/2 a base width.

Cynwyl Cadarn and his cavalry decided to use their LPs to add to their agression as they had got the charge in, with the Saxons doing the same trusting that the Gods would see them safe. The first combat was a draw, but Cynwyl Cadarn forced the central unit of Saxons back 1/2 a base width. Unfortuntely for the Late Romans, the Orindary Riders failed miserably and were destroyed by Saxon testorone, but at least caused 2 hits in return.

Most unit charge home.

Not looking good for the Skirmishers with Bow.

The attacks go in in the centre.

The cavalry charge home hoping to break the Saxon left flank.

The outcomes of the combat.


The Late Roman left flank is under pressure.

The Shieldwall starts to break up under the Saxon onslaught.

The cavalry charge didn't go quite to plan...


Turn4
The Late Romans were now down by 2 LPs due to the loss of their Skirmishers and Cavalry unit. This was going to make it hard to decide where and how use their 4 LPs this turn. The advantage definitely looked to be with the Saxons.

There was little shooting but the remaining Late Roman Skirmishers with Bow saw off their opposite numbers.

Cynwyl Cadarn decided to charge home but was counter charged by the Saxon Warriors on his flank.  The rest of the Late Romans were once again charged by the Saxons where they possibly could. This looked like it could be a decisive turn. The Late Romans were going to have to step up to the mark this turn.

Unsuprisingly the remaining Skrimishers with Bow succumbed to a massive Saxon onslaught, but at least went down fighting causing 1 hit in return. In the centre the Shieldwall was forced back by a succession of saxon attacks, despite using their few remaining LPs to save some hits. The Late Roman cavalry fared badly, causing plenty of hits, but losing the noble Riders, which meant that Cynwyl Cadarn and his Companions were left facing 3 Saxon Warriors units, albeit with quite a few hits on them.

The charges take place.

More attacks go in in the centre.

The Late Roman line begins to buckle under the onslaught.

The Late Romans are pushed back on all fronts.

The centre survives but for how long?

Cynwyl Cadarn and his Companions are very isolated.


End of Battle
With the loss of another two units, the Late Romans were now down to only 2 LPs and with one flank turned and the other very much at risk of being broken. With the situation as it was I decided to call it a day, with the Late Romans leaving the field and the Saxons victorious.

Conclusions
For a first game of Dux Bellorum I must say it all went very well and I hardly had to refer to the rulebook, mainly using the QRS throughout. I think this speaks volumes about the quality of the rules. So  a few impressions of the game can be found below:

  • The game was very easy to pick and provided a quick (as it turned out) and enjoyable battle. Nothing seemed confusing or caused me to scratch my head at any point.
  • Having played plenty of Blitzkreig Commander, the idea and use of the Leadership Points seemed very natural. Others not used to the Warmaster Ancients stable of games might find this a bit unusual at first.
  • The movement of Agressor followed by Repellor units in their respective order works really nicely. I didn't use the Interrupt rule for my solo game, but I am looking forward to giving it a go when I play against my regular gaming chums.
  • The simultaneous shooting and combat gets a big thumbs up from me. 
  • Leadership Points are, unsuprisingly, the USP of this game. Knowing when and where to use them brings a real tactical challenge to the game. Again this will fully come to the fore when playing against my Chums.
  • I think a 2' x 2' board is a bit too small, especially with a warband that has cavalry. I would think a minimum size would be 3' x 2'. I really didn't get the chance to use the cavalry properly as they were hemmed in by the hedgeline.
  • For larger warbands or multi-player games a standard 6' x 4' table would do nicely.
  • I think this game will scale up nicely, probably allowing for up to 3 players per side when played on a 6' x 4' table, with each player having his own warband. I can see this producing an awful lot of fun games.
 
So there you have it. My first game of Dux Bellorum and one that I must say I enjoyed immensely. I'm already looking forward to my next game and many more in the future. Now I must find some time and place an order with those Pendraken chaps so that I can play with figures rather than counters!

Sunday, 13 January 2013

Dux Bellorum

My first tentative steps into wargaming took place in the dim and distant past of the 1970s, when my friends and I started using the Airfix WW2 wargames rules by Bruce Quarrie, to go with our Airfix and Matchbox figures and tanks. Alongside these appeared 'The Quest of Thane Tostig', a simple set of wargames rules that introduced me to fantasy skirmish wargaming. This in turn led to playing 1st edition D&D at school, as well as Chainmail and another game, the name of which escapes me.

In short I was hooked on skirmish wargames, as I enjoyed the whole 'ancients' feel of the games as well as the fun of painting up just a few figures required for a game. Then real life intervened in the form of university and wargaming took a back seat, except for the odd boardgame game snatched between projects. 

Then, like many others I'm sure, I drifted back into wargaming whilst living in Nottingham as a result of looking in the Games Workshop window. I dabbled in Warhammer but although the 'period' was right, I just never got into the game the way that others did. However I still bought the then excellent White Dwarf magazine as I used to buy it when it first came out, and in a sense kept up with what was going on at Games Workshop. An article appeared with some simple rules for a game called 'Mordheim', that ticked all the boxes as far as I was concerned and which took me back to my formative wargames years. 

I happily played these to the exclusion of all else for about 5 years until it stopped being supported by Games Workshop, coupled with my regular gaming chums being unable to make it to club nights. So ended my skirmish gaming. I even tried Lord of the Rings which was good, but this never took off at the club. The same was true of Legends of the High Seas. All was not lost as I rediscovered WWII wargaming in the form of Flames of War, which was quickly ditched for the superb Blitzkreig Commander. Alongside this I played Rules of Engagement so I was getting my fix of skirmish gaming. 

Lately however I have been looking to go back to my wargaming roots so to speak. With the appearance of several 'ancients' rules of late, it seemed I would be spoilt for choice. So which ruleset to choose? 'Hail Caesar' by Warlord Games, SAGA, 'Dux Brittaniarum' by TTFL and finally 'Dux Bellorum' by Osprey Publishing all have their advocates and I'm sure produce good games. One of the joys, and pitfalls, of the internet, is that you can find plenty of online reviews of each game on various forums, Blogs etc. This is a blessing and, equally, a curse as it can get a bit confusing with a host of different views on offer.

After plenty of reading I settled on 'Dux Bellorum'.


I won't bore you with why I rejected the others, but a few reasons can be found below as to why I selected this ruleset:
  • It contained everything in one book of 64 pages, including Army lists.
  • There would be no need to buy supplements, a rare thing these days in the world of wargaming!
  • It cost me less that £8.00 including p&p, again unheard of in these days of the £30 coffee table rulebook.
  • I liked the look of the rules and the way they played as they seemed to fit my style of wargaming, which is naturally rather important. Too many times have I bought rules that everyone has said are good, only for them to be sold off within the year at a bring'n'buy at a show.
So the book was duly ordered and I waited with keen anticipation for them to arrive. I was not to be disappointed in my purchase. So a few first impressions: 

  • The book is beautifully produced as you would expect from Osprey Publishing.
  • It is well bound and with a good weight of paper so fingers crossed should not fall apart quickly, unlike some other rulebooks.
  • The book is very well layed out and flows naturally, from the introduction by the author Daniel Mersey, all the way through to the scenarios at the end.
  • The rules are very easy to follow with nice and simple diagrams to accompany the text where necessary. Each section starts with a basic overview followed by detailed explanations, which aids understanding in my opinion.
  • There are optional rules within each section that allow you to play in a slightly different style if required, mainly in keeping with 'standard' rules from other rulesets.
  • The book is not packed out with unnecessary 'fluff', but has some nice images from Osprey books and photographs of miniatures, mainly 15mm and 28mm.
  • There are 7 army lists in the book, Late Roman, Romano-British, Welsh, Saxon, Irish, Picts, Land Raiders and Sea Raiders. The latter two are slightly different form of the others with the exceptions of the Late Romans. Within each list there is usually the option to have them as either shieldwall (defence) or warrior (offence), as well as mainly cavalry or foot. Most lists can also take Allies, therefore giving more variety should it be required.
  • A big warband will really only consist of 10 bases. Yes that's ten bases! No need to paint up hundreds of figures, unless you want to of course.
  • The section called 'Strategies and Tactics' is a real winner as it allows you to tweak you warband to suit its background or your playing style, by buying certain attributes for said warband. As an example, I love the 'Stampede' option as it allows you to drive cattle, or similar, towards your enemy to disrupt them! This just appeals to my wargaming sense of fun.
  • There are 6 scenarios at the end, all of which look nice and simple to play. The rules themselves will allow for plenty others to be created I'm sure.

So there you have it. A set of rules that I'm extremely glad I bought and can't wait to get my first game in. They may not be for you but I'd recommend having a look at them if you can.